 黑客技术
点击放大
wifi_ducky - Upload, save and run keystroke injection payloads
项目说明
---
> ⚠️ Click here for the new 'WiFi Duck'
The WiFi Duck (no *y*) is an entirely new project and uses different connections between the Atmega32u4 and ESP8266.
---
Wi-Fi Ducky
Upload, save and run keystroke injections remotely with an ESP8266 + ATmega32u4
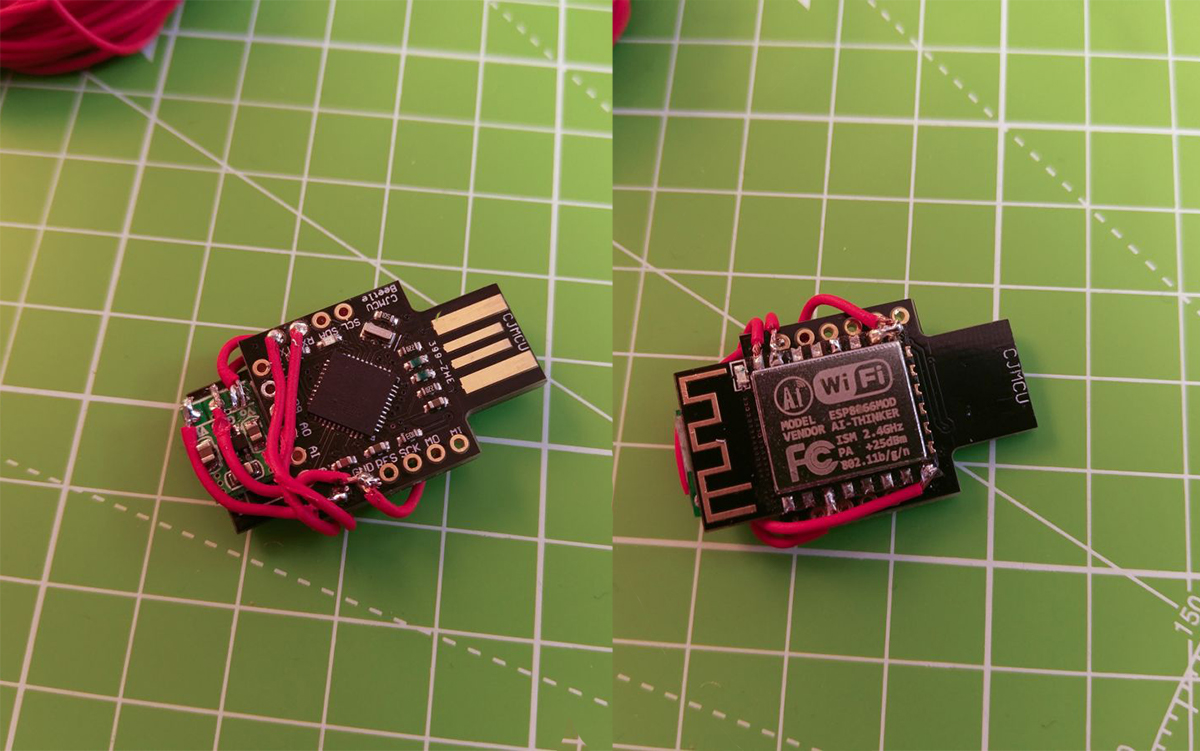
!image of my DIY Wi-Fi Duck
Support me and my projects on Patreon!
<img width="200" alt="Support me on Patreon" src="
Contents
- What it is
- How it works
- The benefits of adding Wi-Fi
- Preparation
- ESP8266
- Arduino ATmega32u4
- Wire e up
- Update ESP8266 over the Webinterface
Introduction ##
What it is
It's a Wi-Fi controlled BadUSB device to remotely execute Ducky Scripts.
Using a USB device which act as a keyboard to inject keystrokes is well known these days.
The USB Rubber Ducky by Hak5 is THE hacker gadget for this kind of attack. It introduced a simple script language called *Ducky Script*, which this project uses too.
How it works
The ESP8266 is a popular Wi-Fi chip used in a lot of projects. Because it's cheap, small and has its own file system (SPIFFS), it's perfect for enabling an easy remote connection and holding Ducky Script payloads.
Although the ESP8266 is awesome, it doesn't ha USB, which means it can't act as a keyboard :(
(cnlohr made a cool project on this and added a USB stack himself: The problem with that is, that it isn't compatible with the current SDK , also I wanted to use Arduino to make it more user friendly.)
Here comes the ATmega32u4 into play!
It can act as keyboard and thanks to Seytonic run Ducky Script (link).
So what I did is connecting the ATmega to the ESP8266 .
The ESP will open up a Wi-Fi access point and host a web interface from what you can upload and manage your scripts.
When you hit run, it will send the script to the ATmega, which then will execute it on the target machine.
The benefits of adding Wi-Fi
But why add Wi-Fi ...you might ask.
With Wi-Fi you can upload and run your Ducky Script payloads remotely.
You just need to plug the device in, connect to its Wi-Fi 网络 and you have full control over the target machine.
It also gives you one big ad o BadUSBs, you can test your scripts live! You don't need to copy them onto a micro-sd card or compile them. You can run them live over the web interface, which makes its super easy for testing and improving your scripts.
It also adds a lot of possibilities for different attacks.
You could make the target download executables from the Wi-Fi chip, instead of the internet.
Or execute different attacks and send the results back to the Chip. Or open up a reverse shell on the ESP8266s Wi-Fi.
And so on... there are so much possibilities!
Disclaimer
Use it only for testing purposes on your own devices!
I don't take any responsibility for what you do with this project.
Installation
Short :
Upload the
arduino_wifi_duck sketch to your ATmega32u4 and upload the esp8266_wifi_duck sketch to your ESP8266. Then connect the serial pins (RX and TX (Arduino) to TX and RX (ESP8266)) and GND.
---
Preparation
What you will need:
I recommend using an ESP-12. It's widely used, cheap, tiny and has 4MB of flash memory.
However if you're a beginner you should probably start with a de board like the NodeMCU or a Wemos d1 mini.
The Arduino Micro and Arduino Leonardo use an ATmega32u4 for example. You could also get a Arduino Pro Micro or other cheap Arduino clones which use the ATmega32u4. I will use an ATmega32u4 CJMCU Beetle.
I put that in brackets because you will only need this if your ATMega32u4 board doesn't provide 3.3V. The ESP8266 only works with 3.3V, so depending on your board you may need a regulator to get 3.3V out of the 5V.
That's probably the most important part here. This project is not noob friendly! If you are a beginner, please start with other projects and get some knowledge about how Arduino and its 代码 works, how to handle errors and how to work with the ESP8266. I can't co little detail here. Please respect that. Depending on your hardware choices you may need to add or change a bit of the Arduino 代码.
So make your hardware choices!
Also I wouldn't go straight forward and solder e together. Test it beforehand, otherwise debugging can be hard!
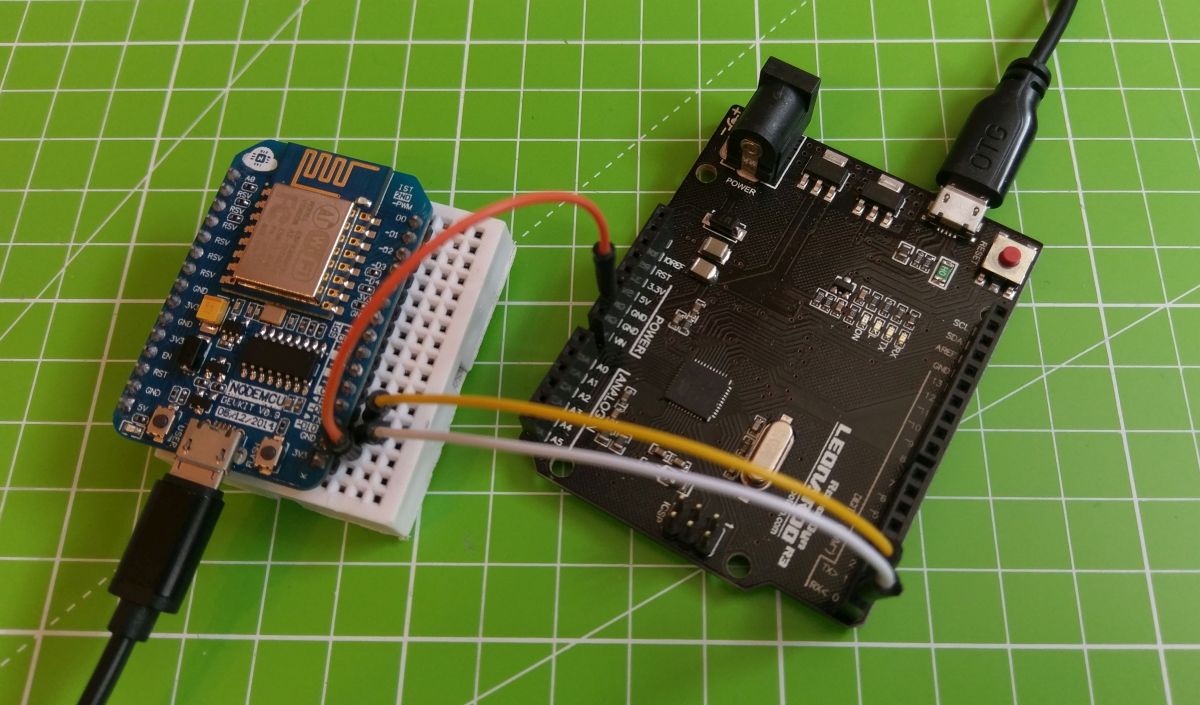
For an easy start, better debugging, further de or if you just wanna test this project, I recommend using a Nodemcu + an Arduino Leonardo:
!nodemcu with a leonardo as wifi duck
This is easy to setup, you don't need any soldering skills and you can still use both the NodeMCU and the Arduino for other cool projects.
But now let's get started!
ESP8266
First you will need to flash your ESP8266.
You can either flash the bin file directly or compile it yourself using Arduino.
Note: You will only need to flash it once, every new update can then be done over the possibilities.
If don't use a USB de and don't know how to flash your plain ESP8266, I recommend you to have a look at this instructable:
You could also use your Arduino to flash it:
(The connections are the same for this project, the only difference is that you need to set GPIO-0 to LOW to enabling a firmware update).
Flash the .bin File
Go to releases and download the right bin file for your ESP8266.
You can flash it with the esptool or the nodemcu-flasher.
Upload using Arduino
Open the esp8266_wifi_duck sketch with Arduino.
You need to install the following libraries:
Then compile and upload it to your ESP8266 (check if your settings are right).
Arduino ATmega32u4
Open the arduino_wifi_duck sketch in Arduino and upload it to your Arduino.
Wire e up
Ok so now you need to connect the ESP8266 with the Arduino.
Connect these pins:
| Arduino | ESP82666 |
| ------------- |:-------------:|
| TX | RX |
| RX | TX |
| GND | GND |
| VCC (3.3V) | VCC (3.3V) |
Like I mentioned before, you'll need a 3.3 if your Arduino only provides 5V.
Don't connect the ESP8266 to 5V!
If you use a plain ESP-12 like me, you also have to set the enable pin and to HIGH and GPIO15 to LOW:
| PIN | Mode |
| ------------ |:----------:|
| GPIO15 | LOW (GND) |
| CH_PD (EN) | HIGH (3.3V)|
Update ESP8266 over the Web interface
Once you flashed the software, you can update it over the web interface.
Go to 192.168.4.1/update and upload the new .bin file.
(In Arduino go to Sketch->Export compiled Binary to compile your own .bin file)
How to use it
Plug your Wi-Fi Ducky in and connect to the new Wi-Fi 网络 WiFi Duck. The password is quackquack.
Open your browser and go to 192.168.4.1.
!screenshot of the webinterface
There you can now upload, view, delete and run new Ducky Scripts.
PLEASE NOTE that the max length per row for a script is 600 chars.
How to write Ducky Scripts:
Happy hacking :)
Impro
My wishlist:
License
This project is licensed under the MIT License - see the license file file for details
Sources and additional Links
The USB Rubber Ducky:
The Malduino (a BadUSB-Arduino/Rubber-Ducky-alternative by Seytonic):
Seytonic:
Arduino Ducky Script interpreter:
Cnlohrs ESP8266 USB Software Driver:
项目信息
开发语言:C
Star 数:1444
技术要点
该项目属于黑客技术方向的开源资源,代码结构清晰,适合安全研究人员学习参考。项目围绕Upload, save and run keystroke injection payloads with an ESP8266 + ATMEGA32U4展开,提供了可运行的实现,对理解相关安全机制、工具原理与攻防技术具有较高的研究价值。
从技术实现角度看,此类项目的核心在于对底层原理的深入理解与工程化落地。开发者在研究过程中可以结合官方文档与社区讨论,梳理项目的初始化流程、核心模块职责与数据流转,逐步掌握其中的技术细节与设计思路。
使用与学习建议
1. 下载源码压缩包,解压到本地环境。
2. 根据项目类型准备对应的运行环境与依赖。
3. 按照 README 中的步骤完成配置与部署。
4. 在隔离的测试环境中运行验证,避免影响生产系统。
免责声明
本资源来源于开源社区,仅供安全研究、技术学习与合法授权范围内的攻防演练使用,请勿用于任何非法或侵害他人权益的用途。使用本项目产生的一切后果由使用者自行承担。
| 资源标题 | wifi_ducky - Upload, save and run keystroke injection payloads |
| 所属分类 | 黑客技术 |
| 发布作者 | admin |
| 发布时间 | 2026-10-05 22:13:06 |
| 下载权限 | 免费下载 |
| 附件数量 | 2 个下载链接 |
| 浏览次数 | 173 |
| 讨论数量 | 0 |
| 主题状态 | 正常讨论中 |