 安全软件
点击放大
L0p4Map - Professional network monitoring & visualization to
项目说明
<di="center">
L0p4Map
!Traffic Analyzer
Nmap was blind. L0p4Map sees.
!Python
!Platform
!License
!Status
Professional network monitoring & tool built for security researchers.
</div>
---
What is L0p4Map?
L0p4Map is a professional grade network monitoring tool that combines the power of nmap with a clean, modern dark UI. Designed for security researchers and network administrators who need fast, detailed into their infrastructure.
No bloat. No BS. Just raw network intelligence.
Now a on Linux, Windows and macOS.
---
Features
sysDescr query (no external libs).txt---
Screenshots
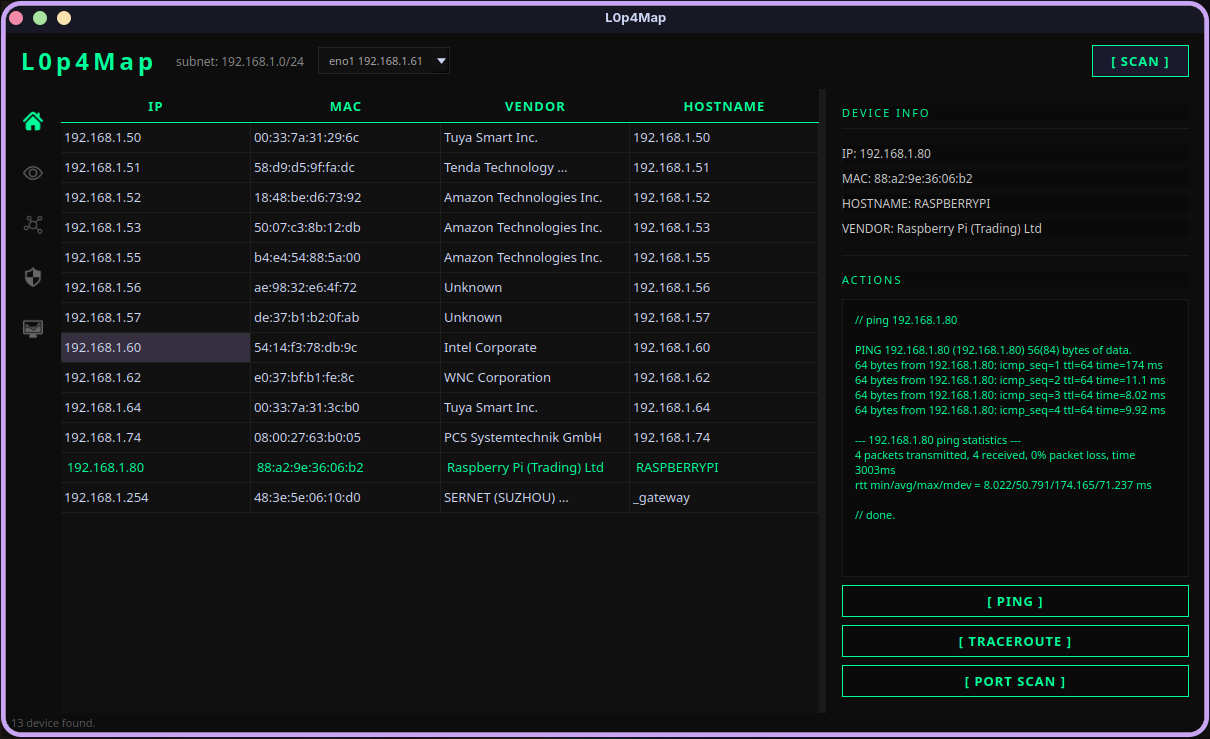
Home: Network Scanner
!Home
Port Scan: Full nmap Integration
!Port Scan
Network Topology: Hierarchical topology graph
!Network Topology Graph | Hierarchical
Network Topology: Force Atlas layout
!Network Topology Graph | Force Atlas
Attack Surface: Exposed services, open ports and o
!Attack surface section
Traffic Analyzer: Real-time network traffic analysis
!Traffic Analyzer
---
Requirements
Linux (Debian or Arch)
sudo pacman -S nmap or sudo apt install nmap)Windows 10/11
macOS (Intel and Apple Silicon)
brew install nmap)---
Installation
Linux
Arch Linux users can install directly from the AUR:
Alternatively, on any Linux distribution:
macOS
Windows
Make sure nmap and Npcap are installed and a in the system PATH before launching the tool.
---
Usage
Linux and macOS
Launch the tool with root pri:
Windows
Open a terminal (PowerShell or CMD) as Administrator, then:
Workflow
1. Select the network interface from the toolbar dropdown
2. Press [ SCAN ] to discover all devices: each host is fingerprinted via TTL, port probing and SNMP
3. Click a device to see details and run quick actions (ping, traceroute, port scan)
4. Switch to Graph to explore the real network topology: ho for full device info, double click to assign a custom label
5. Toggle between [ HIERARCHICAL ] and [ FORCE ATLAS ] layout from the graph view
6. Use Attack Surface to run a deep nmap + scan on any host and review CVEs
7. Use Traffic Analyzer to capture li, filter by device or protocol, and export to CSV
8. Enable [ LIVE ] in the graph view to keep the topology updated automatically
9. Enable Continuous Monitoring to keep the agent passively listening on ARP/mDNS and recei on new devices, without having to restart a full scan
---
Legal Disclaimer
This tool is designed for authorized network auditing only. Only use L0p4Map on networks you own or ha permission to test. Unauthorized scanning is illegal.
---
Author
HaxL0p4: GitHub
---
项目信息
开发语言:Python
Star 数:963
技术要点
该项目属于安全软件方向的开源资源,代码结构清晰,适合安全研究人员学习参考。项目围绕Professional network monitoring & visualization tool. L0P4Map combines high-speed ARP discovery with full nmap integration and a real-time interactive network topology engine. Works on both local networks and custom IPs/websites.展开,提供了可运行的实现,对理解相关安全机制、工具原理与攻防技术具有较高的研究价值。
从技术实现角度看,此类项目的核心在于对底层原理的深入理解与工程化落地。开发者在研究过程中可以结合官方文档与社区讨论,梳理项目的初始化流程、核心模块职责与数据流转,逐步掌握其中的技术细节与设计思路。
使用与学习建议
1. 下载源码压缩包,解压到本地环境。
2. 根据项目类型准备对应的运行环境与依赖。
3. 按照 README 中的步骤完成配置与部署。
4. 在隔离的测试环境中运行验证,避免影响生产系统。
免责声明
本资源来源于开源社区,仅供安全研究、技术学习与合法授权范围内的攻防演练使用,请勿用于任何非法或侵害他人权益的用途。使用本项目产生的一切后果由使用者自行承担。
| 资源标题 | L0p4Map - Professional network monitoring & visualization to |
| 所属分类 | 安全软件 |
| 发布作者 | admin |
| 发布时间 | 2026-10-05 22:34:59 |
| 下载权限 | 免费下载 |
| 附件数量 | 2 个下载链接 |
| 浏览次数 | 84 |
| 讨论数量 | 0 |
| 主题状态 | 正常讨论中 |