 安全软件
点击放大
nerve - NERVE Continuous Vulnerability Scanner
项目说明
Network Exploitation, Reconnaissance & Engine (N.E.R.V.E)
!Nerve
Table of Contents
* Continuous Security
* About NERVE
* What is NERVE
* Features
* Prerequisites
* Installation
* Deployment Recommendations
* Installation - Docker
* Installation - Bare Metal
* Installation - Multi Node
* Upgrade
* Security
* Usage
* License
* Mentions
* Screenshots
Continuous Security
We belie scanning should be done continuously. Not daily, weekly, monthly, or quarterly.
The benefit of running security scanning contiuously can be any of the following:
* You have a dynamic en where infrastructure gets created every minute / hour / etc.
* You want to be the first to catch issues before anyone else
* You want the ability to respond quicker.
NERVE was created to address this problem. Commercial tools are great, but they are also heavy, not easily extensible, and cost money.
!Nerve
About NERVE
NERVE is a scanner tailored to find low-hanging fruit le, in specific application configurations, network services, and unpatched services.
Example of some of NERVE's detection capabilities:
* Interesting Panels (Solr, Django, PHPMyAdmin, etc.)
* Subdomain takeovers
* Open Repositories
* Information Disclosures
* Abandoned / Default Web Pages
* Misconfigurations in services (Nginx, Apache, IIS, etc.)
* SSH Servers
* Open Databases
* Open Caches
* Directory Indexing
* Best Practices
It is not a replacement for Qualys, Nessus, or OpenVAS. It does not do authenticated scans, and operates in black-box mode only.
Features
NER the following features:
* Dashboard (With a Login interface)
* REST API (Scheduling assessments, Obtaining results, etc)
* Notifications
* Slack
* Webhook
* Reports
* TXT
* CSV
* HTML
* XML
* Customizable scans
* Configurable intrusi levels
* Scan depth
* Exclusions
* DNS / IP Based
* Thread Control
* Custom Ports
* Network Topology Graphs
We put together the Graphical User Interface primarily for ease of use, but we will be putting more emphasis on detections and new signatures than creating a full blown user interface.
Prerequisites
NERVE will install all the prerequisites for you automatically if you choose the Ser (CentOS 7.x and Ubuntu 18.x were tested) (by using
install/setup.sh script). It also comes with a Dockerfile for your con. Keep in mind, NER root access for the initial setup on bare metal (package installation, etc).
Services and Packages required for NERVE to run:
* Web Server (Flask)
* Redis server (binds locally)
* Nmap package (binary and Python nmap library)
* Inbound access on HTTP/S port (you can define this in config.py)
The installation script takes care of e for you, but if you want to install it by yourself, keep in mind these are required.
Installation
Deployment Recommendation
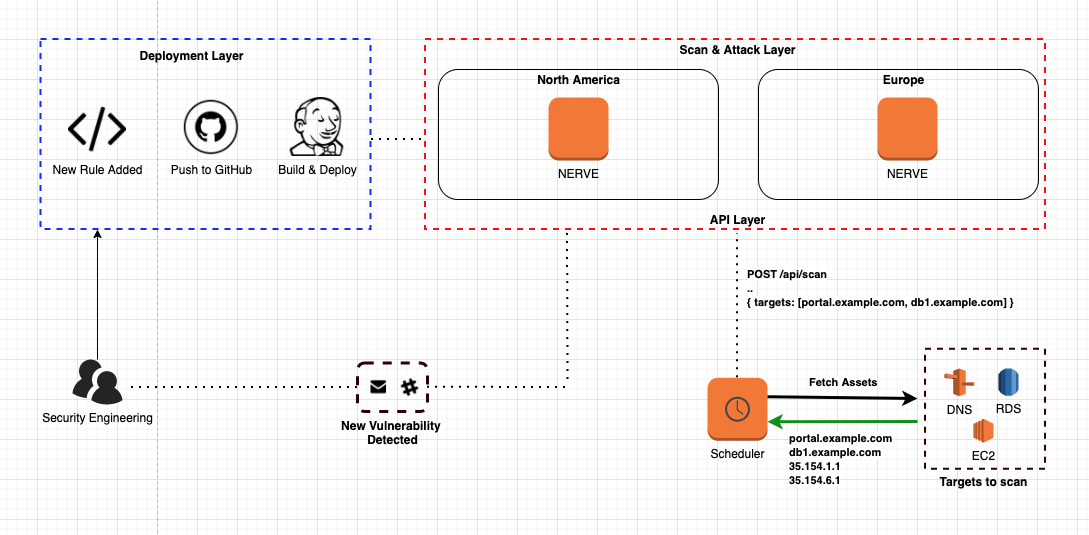
The best way to deploy it, is to run it against your infrastructure from multiple regions (e.g. multiple instances of NERVE, in multiple countries), and toggle continuous mode so that you can catch short-li in dynamic en/cloud.
We typically recommend not to whitelist the IP addresses where NERVE will be initiating the scans from, to truly test your infrastructure from an attacker standpoint.
To make NER lightweight, there's no use of a database other than Redis.
If you want to store your long term, we recommend using the Web hook feature. At the end of each scan cycle, NERVE will dispatch a JSON payload to an endpoint of your choice, and you can then store it in a database for further analysis.
Here are the high le we recommend to get the most optimal results:
1. Deploy NERVE on 1 or more servers.
2. Create a script that fetches your Cloud services (such as AWS Route53 to get the DNS, AWS EC2 to get the instance IPs, AWS RDS to get the database IPs, etc.) and maybe a static list of IP addresses if you ha in a Datacenter.
3. Call NERVE API (POST /api/scan/submit) and schedule a scan using the assets you gathered in step #2.
4. Fetch the results programmatically and act on them (SOAR, JIRA, SIEM, etc.)
5. Add your own logic (exclude certain alerts, add to database, etc.)
Docker
Clone the repository
git clone :PaytmLabs/nerve.git && cd nerveBuild the Docker image
docker build -t nerve .Create a container from the image
docker run -e username="YOUR_USER" -e password="YOUR_PASSWORD" -d -p 80:8080 nerveIn your browser, na to and login with the credentials you specified to in the previous command.
Server
Na to /opt
cd /opt/Clone the repository
git clone :PaytmLabs/nerve.git && cd nerveRun Installer (requires root)
bash install/setup.shCheck NERVE is running
systemctl status nerveIn your browser, na to and use the credentials printed in your terminal.
Multi Node Installation
If you want to install NERVE in a multi-node deployment, you can follow the normal bare metal installation process, afterwards:
1. Modify the config.py file on each node
2. Change the ser of Redis
RDS_HOST to point to a central Redis server that all NER will report to.3. Run
service ner or systemctl restart nerve to reload the configuration4. Run
apt-get remo / yum remo (Depending on the Linux Distribution) since you will no longer need each instance to report to itself.Don't forget to allow port 3769 inbound on the Redis instance, so that the NER can communicate with it.
Upgrade
If you want to upgrade your platform, the fastest way is to simply git clone and o all the files while keeping key files such as configurations.
* Make a copy of config.py if you wish to save your configurations
* Remove /opt/nerve and git clone it again.
* Move config.py file back into /opt/nerve
* Restart the service using systemctl restart nerve.
You could set up a cron task to auto-upgrade NER's an API endpoint to check whether you have the latest or not that you could use for this purpose: GET /api/update/platform
Security
There are a few security mechanisms implemented into NERVE you need to be aware of.
* Content Security Policy - A response header which controls where resource scan be loaded from.
* Other Security Policies - These Response headers are enabled: Content-Type Options, X-XSS-Protection, X-Frame-Options, Referer-Policy
* Brute Force Protection - A user will get locked if more than 5 incorrect login attempts are made.
* Cookie Protection - Cookie security flags are used, such as SameSite, HttpOnly, etc.
If you identify a security , please submit a bug to us on GitHub.
We recommend to take the following steps before and after installation
1. Set a strong password (a password will be set for you if you use the bare metal installation)
2. Protect the inbound access to the panel (Add your management IP addresses to the allow list of the local firewall)
3. Add HTTPS (you can either patch Flask directly, or use a reverse proxy like nginx)
4. Keep the instance patched
Usage
To learn about NERVE (GUI, API, etc.) we advise you to check out the documentation a to you via the platform.
Once you deploy it, authenticate and on the left sidebar you will find a documentation link for API and GUI usage.
GUI Documentation
!Nerve
API Documentation
!Nerve
License
It is distributed under the MIT License. See LICENSE for more information.
Mentions
:trophy: NERVE has been mentioned in places so far, here are a few links.
* Kitploit -
* Hakin9 -
* PentestTools -
* SecnHack.in -
* 100security.com -
Screenshots
Login Screen
!Nerve
Dashboard Screen
!Nerve
Assessment Configuration
!Nerve
API Documentation
!Nerve
Reporting
!Nerve
Network Map
!Nerve
page
!Nerve
Log Console
!Nerve
HTML Report
!Nerve
项目信息
开发语言:Python
Star 数:455
技术要点
该项目属于安全软件方向的开源资源,代码结构清晰,适合安全研究人员学习参考。项目围绕NERVE Continuous Vulnerability Scanner展开,提供了可运行的实现,对理解相关安全机制、工具原理与攻防技术具有较高的研究价值。
从技术实现角度看,此类项目的核心在于对底层原理的深入理解与工程化落地。开发者在研究过程中可以结合官方文档与社区讨论,梳理项目的初始化流程、核心模块职责与数据流转,逐步掌握其中的技术细节与设计思路。
使用与学习建议
1. 下载源码压缩包,解压到本地环境。
2. 根据项目类型准备对应的运行环境与依赖。
3. 按照 README 中的步骤完成配置与部署。
4. 在隔离的测试环境中运行验证,避免影响生产系统。
免责声明
本资源来源于开源社区,仅供安全研究、技术学习与合法授权范围内的攻防演练使用,请勿用于任何非法或侵害他人权益的用途。使用本项目产生的一切后果由使用者自行承担。
| 资源标题 | nerve - NERVE Continuous Vulnerability Scanner |
| 所属分类 | 安全软件 |
| 发布作者 | admin |
| 发布时间 | 2026-10-05 22:36:44 |
| 下载权限 | 免费下载 |
| 附件数量 | 2 个下载链接 |
| 浏览次数 | 119 |
| 讨论数量 | 0 |
| 主题状态 | 正常讨论中 |