 安全软件
点击放大
red-clippy - open-source pentest management built to be operate
项目说明
Red Clippy
Your agent tests. Red Clippy keeps the record.
Open-source pentest management built to be operated by an AI agent. Connect it
to Claude Code over MCP and it runs the engagement alongside you: scope and
assets, recon obser, methodology co, and findings with CVSS and
e.
> Built for testers who want an agent's speed without giving up the discipline
> of a real engagement. Work does not get repeated, findings do not e
> between sessions, and nothing reaches the report that was ne.
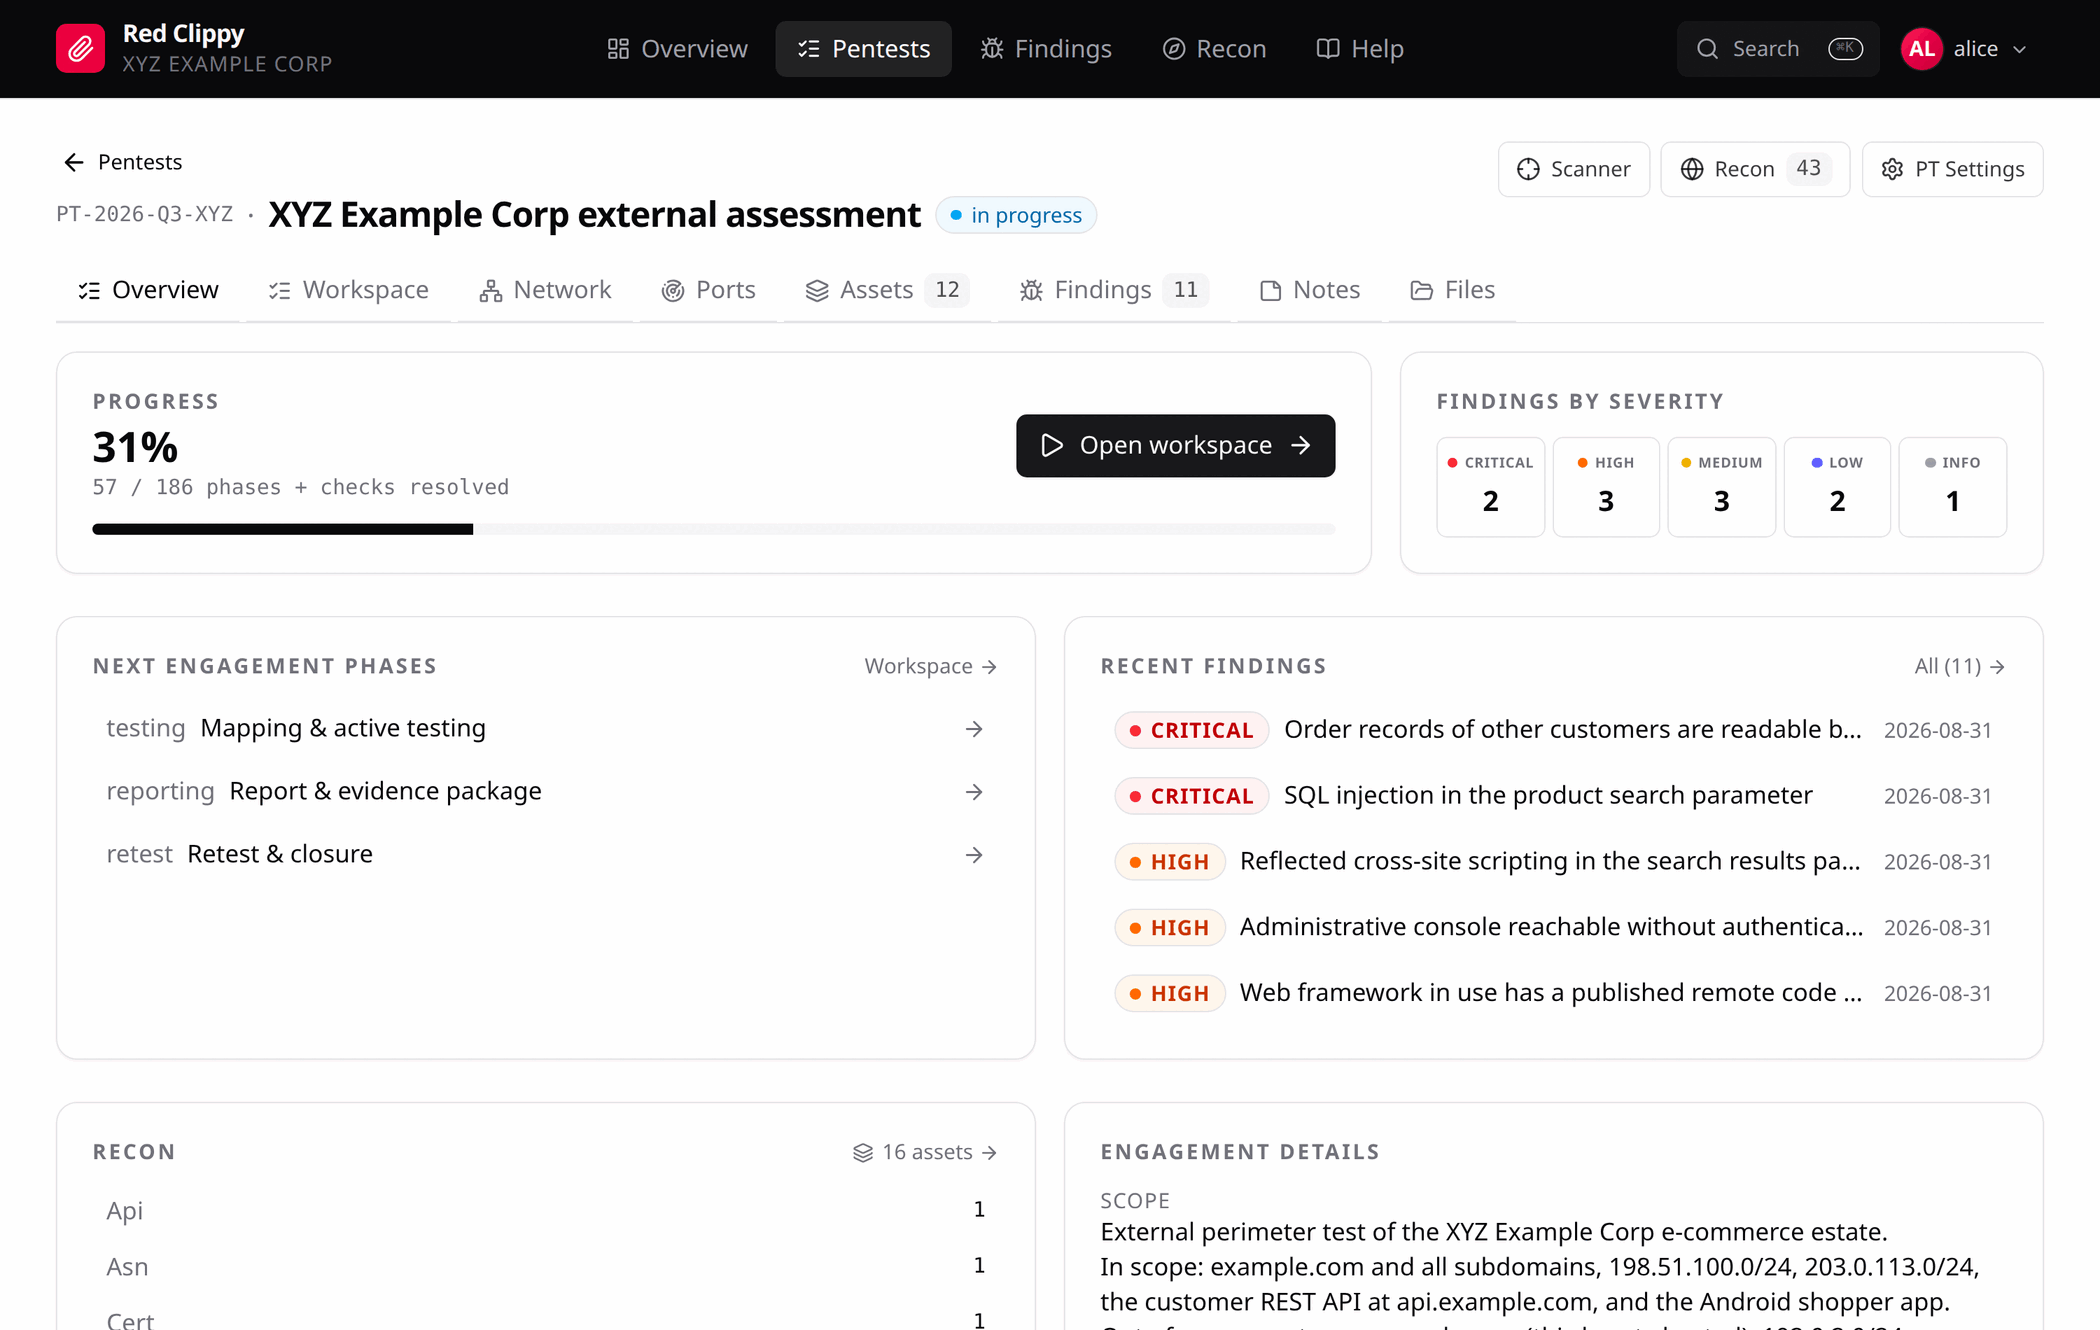
!An engagement in Red Clippy: co progress, findings by se, outstanding phases, recent findings, and the scope from the engagement letter
Full documentation: <
---
Contents
---
Why
Coding agents ha genuinely useful testers. They have a shell, they
run the same tooling you do, and they co fast. Point one at a target
and it will find things.
Then the context window fills up, and the engagement is gone. The next session
rescans hosts it already cleared, re-tests what it already ruled out, and
cannot tell you which parts of the scope were e. Somewhere in the
transcript is a confirmed SQL injection nobody wrote down.
Red Clippy fixes that by giving the agent two things it does not have on its
own.
A place to put the work. Every asset, obser, check, and finding
lands in a database as testing happens, not in a scrollback buffer. Co
becomes a query instead of a memory: which assets exist, which checks are
cleared on each, what has already been reported. Tomorrow's session picks up
exactly where the last one stopped.
Rules to work by. A Red Team Instructions document reaches the agent in
the MCP handshake, before it does anything: before reporting, prove
every claim, take the minimum access needed to demonstrate impact, leave
third-party systems alone. O it per organization and per engagement,
because house rules differ between teams and clients.
You stay in the loop the whole time. E the agent writes is an
ordinary row in the web UI that you can review, correct, reclassify, or throw
away.
> [!CAUTION]
> Authorized testing only. Red Clippy is for penetration testers working
> under an engagement. Test only systems you own or ha written
> permission to assess. Scope marking and the Red Team Instructions exist to
> keep an agent inside the rules of engagement, but they are guardrails, not
> authorization. An agent acts on your authority, and you remain responsible
> for e it does.
---
Quick start
Download a binary from the
latest release and run
it. It sets up the database and serves the panel on 127.0.0.1:7337.
Linux
Windows
Unzip the archive, then from that folder:
Open < and the setup wizard takes over from there.
The database is created in the directory where you run the binary. Uploaded
e is stored there too, in red-clippy-storage. Both paths can be
changed in the config file, see Configuration.
Prefer to compile it yourself? See
Building from source.
---
How the data is organized
Red Clippy groups work into organizations. An organization holds your
pentests, and each pentest holds the assets, findings, and e for that
engagement. If you test for one company, a single organization is all you
need. If you consult for several clients, give each client its own: an
organization sees nothing belonging to another, so their engagements never mix.
An organization has two names. The display name ("XYZ Example Corp") is
what you see in the panel and can be changed later. The slug (xyz) is a
short lowercase identifier used in the e folder on disk
(red-clippy-storage/org_xyz/pentest_PT-2026-08-27/), so it is fixed once
set.
You can belong to several organizations and switch between them from the
avatar menu. In each one you are either an owner, who can add and remove
people and rename or delete the organization, or a member, who works the
engagements.
---
First run
On first launch the database is empty, so the browser shows a setup wizard
instead of a login form. It asks for:
The account it creates is the owner of that organization. The wizard only
appears while the database has no users; once the first account exists it is
permanently disabled, so it cannot be used to create extra accounts later.
After setup, manage organizations and teammates in the app under
avatar menu > Organizations.
If nobody can sign in, the CLI is the way back:
---
Using it
The intended flow is agent-driven. You set up the engagement, then work
through the target with Claude Code while it keeps the record.
You set up:
1. Create a pentest. Code, scope, dates. The methodology checklist is
seeded automatically.
2. Define scope. Add the domains, hosts, and IP ranges you are authorised
to test, and mark anything explicitly out of scope. You can type these in
yourself, or paste the client's scope list to the agent and have it enter
them for you.
3. Connect the agent over MCP, pinned to this engagement (see below).
The agent then works, and records as it goes:
ingest_tool_output, or writes assetsand obser directly.
You supervise:
edit, reclassify, or delete.
organization alongside the pentest it came from.
The agent is optional. It works through the same API the panel does, so
anything it records you can also enter, correct, or delete yourself in the
browser. Run an engagement entirely by hand, entirely through the agent, or
switch between the two as you go.
---
Connecting an AI agent (MCP)
This is the main way Red Clippy is meant to be used.
red-clippy mcp covers the whole application: scope and assets,
obser, methodology co, findings, e, the attack graph, and
tool-output ingestion. A connected agent works the engagement rather than just
answering questions about it.
On connect, the ser the client the Red Team Instructions document,
the operating doctrine for how to beha testing, in the MCP handshake,
so it is in the agent's context before the first tool call. It resolves
most-specific-first, from a per-engagement o, to an organization
default, to the built-in document. Edit the org default under
Settings > Red Team Instructions, or set a per-engagement o from
the pentest's settings page. get_instructions re-reads it on demand.
Create an API key
Issue one under Settings > API keys. The Connect MCP section below it
then gives you ready-to-paste config for each client, with that key, this
server's URL, and the binary's own path already filled in. There is nothing to
substitute by hand.
To create the key from the CLI instead, and paste it into the snippets
yourself:
Claude Code
The name after add is only a label Claude Code shows. The command after --
is what it actually launches, so use the binary's full path: Claude Code will
not necessarily find red-clippy on its PATH. If you copy the command from
Connect MCP in the panel, the right path is already filled in.
z.ai GLM
z.ai serves an Anthropic-compatible endpoint, so Claude Code can drive Red
Clippy with GLM instead of an Anthropic model.
Add this to Claude Code's settings: .claude/settings.local.json inside your
working folder to scope it to one engagement, or ~/.claude/settings.json to
apply it e.
Two things to substitute:
your-z-ai-api-key with your own key. Prefer the project-local.claude/settings.local.json, which Claude Code keeps out of git, so thekey does not end up committed.
glm-5.3 with whiche z.ai currently offers. Model names change,so check
z.ai's Claude Code guide
for the current one and set every entry to it.
Then add the MCP ser as above. Red Clippy is unaffected by the
choice of model: MCP runs client-side, so the tools beha
whiche is behind the agent.
OpenAI Codex CLI
As per the Codex CLI config, in ~/.codex/config.toml:
Any other MCP client
red-clippy mcp is a plain JSON-RPC 2.0 stdio server. It needs two things in
its en, and takes an optional engagement pin:
--pentest binds the session to one engagement so the agent does not have to
name it on every call. Run one MCP entry per acti and switch
engagements by switching servers.
Once connected, you can just ask: *"add a finding to PT-2026-Q2-XYZ: reflected
XSS in /search, high se, here is the PoC"*.
> [!NOTE]
> Your agent and red-clippy serve run on the same machine, which is why
> RED_CLIPPY_URL points at 127.0.0.1.
---
Features
A full MCP tool surface. Near-complete parity with the web UI, not a
token subset. An agent can create and scope assets, attach obser, mark
methodology checks, file and update findings, upload e, build graph
edges, and search across the organization.
Scope that stays clean. Assets are the units you actually test: domains,
hosts, URLs, APIs, mobile packages, IP ranges. Each carries its own checklist,
reachability marking, and in/out-of-scope flag. Recon noise (discovered paths,
tech fingerprints, certificates, wayback URLs) attaches to an asset as an
*obser* rather than entering the scope list, and is promoted to an asset
only when it warrants one. Without that split, a single content-discovery run
leaves the asset list unusable.
Findings through to reporting. Se, CVSS 3.1 with a calculator built
into the form, CWE/CVE, PoC, remediation, and file e. A cross-engagement dashboard lists every
finding in the organization against its source pentest, which is the view a
retest needs.
Co you can query. 135 built-in checks mapped to OWASP WSTG, plus
recon, network, cloud, and OSINT checks. Rollups report what has been tested
per asset and per engagement, so cleared ground is not re-tested.
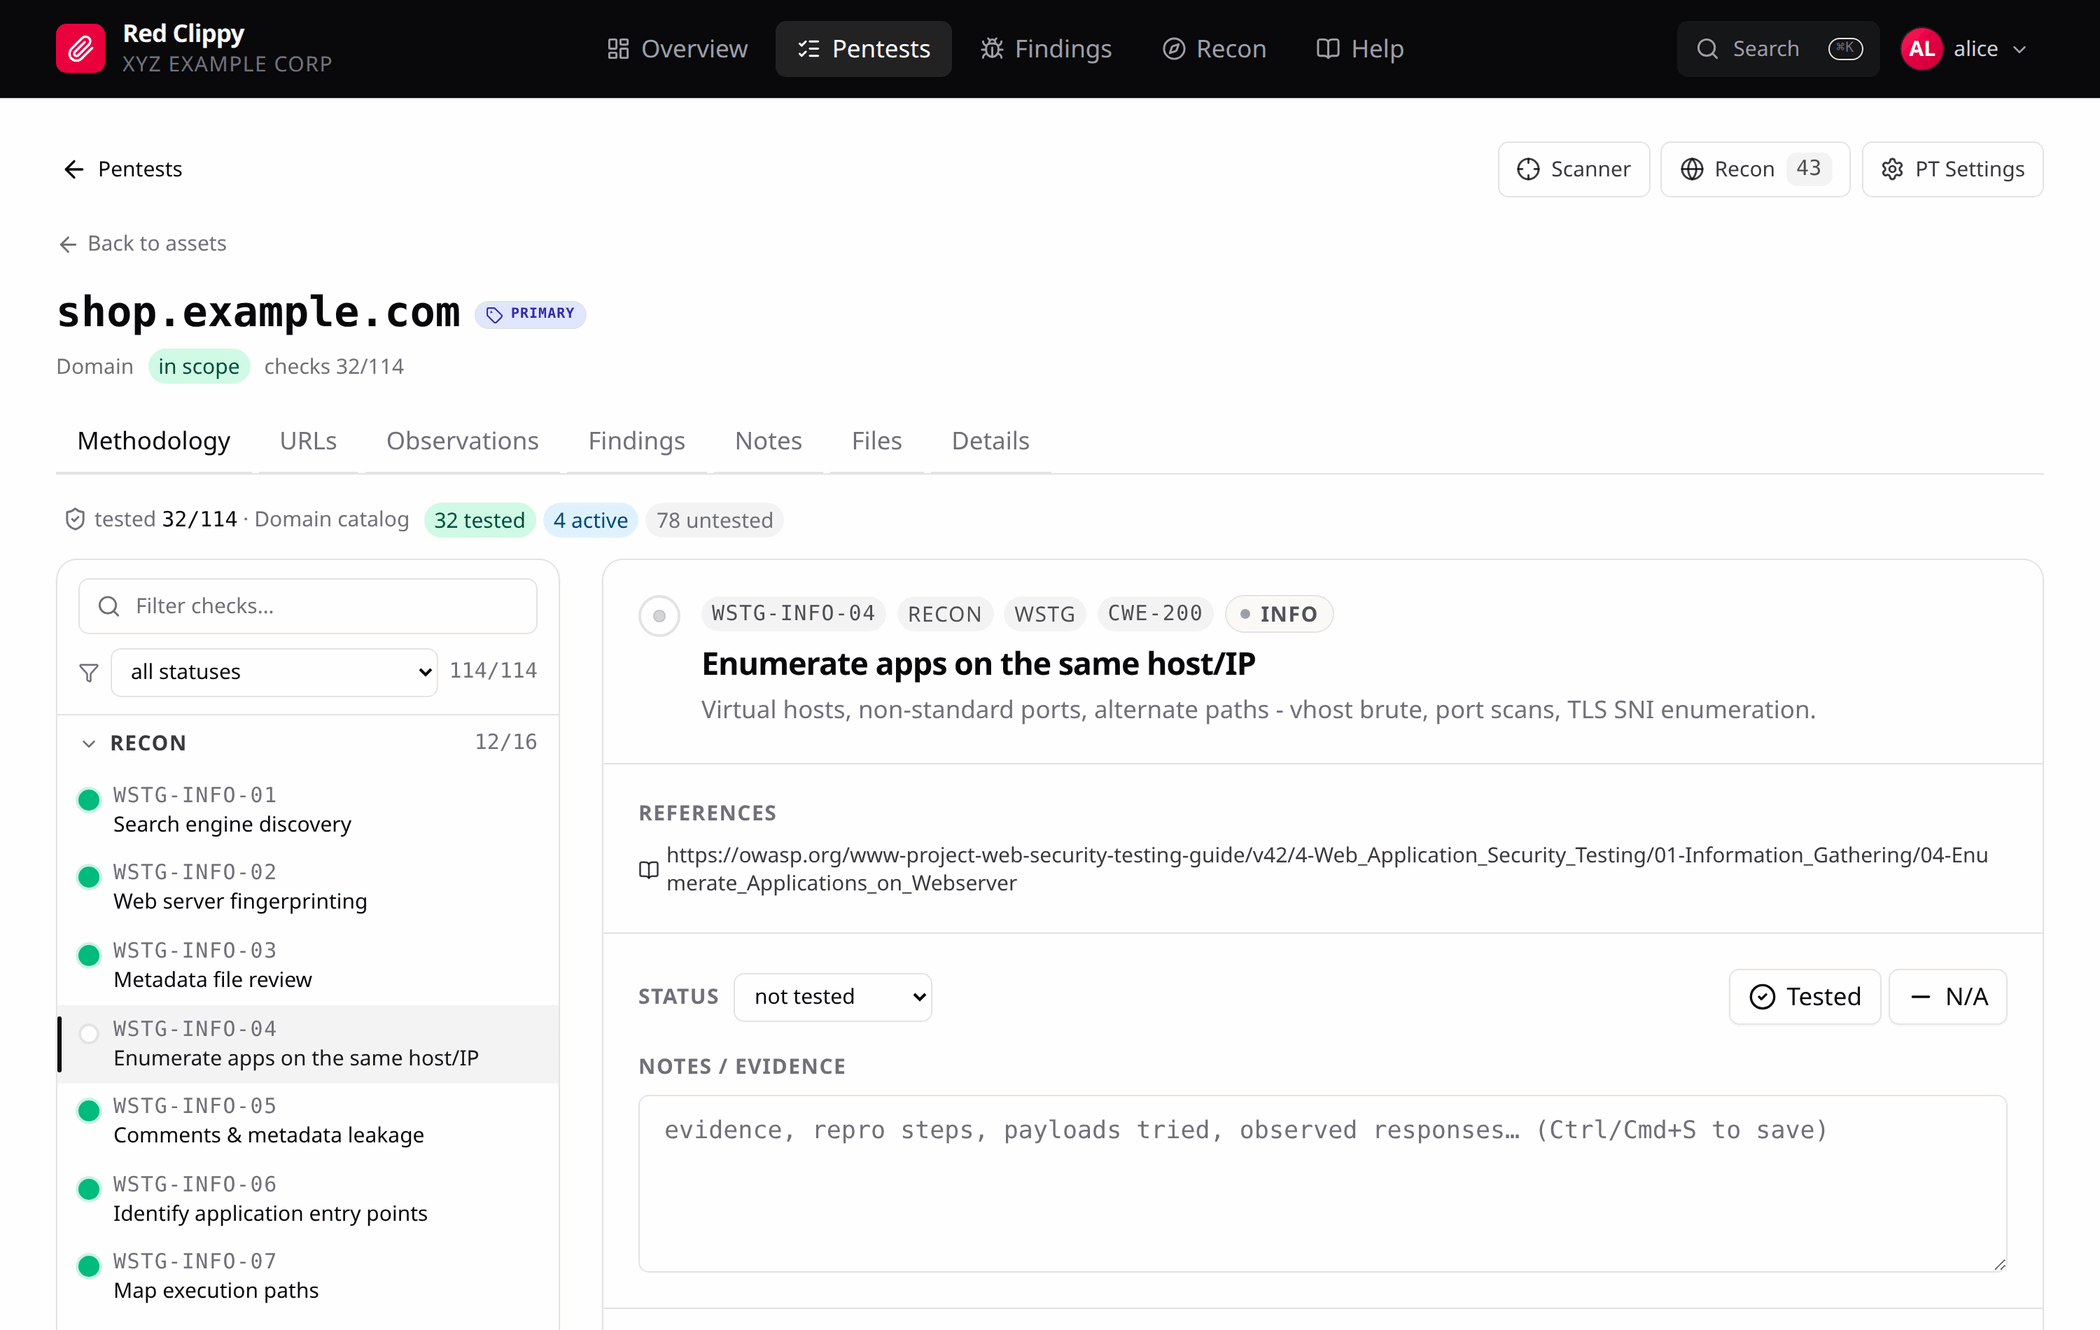
!The methodology workspace for one asset: checks grouped by category on the left, the selected check with its references, status and e box on the right
Operating doctrine. The Red Team Instructions document, served over MCP
and resol, then per-organization, then built-in default.
Tool output ingestion. Raw scanner output is submitted in a single call,
which is how an agent mo out of its own shell and into the record.
Parsers for nmap, burp, nessus, openvas, masscan, naabu, andsubfinder, with format auto-detection. Findings, recon, and raw output land
together in one transaction.
An attack graph. Link any two nodes with a free-form relation, then
traverse neighbours or compute shortest attack paths between them.
Multi-tenant. Every record belongs to an organization. One user can belong
to many and switch without signing out, so client data stays separated.
REST API. Org-scoped bearer keys, same surface as e above.
Optional: a built-in scan runner. A con for driving subfinder,nmap, masscan, and naabu from the Scanning page, with resumable
per-target co. It exists for manual operator use and is not part of the
normal agent-dri, where the agent runs its own tooling and ingests
the output.
The documentation covers all of this
screen by screen, with the MCP tool reference, the REST API and the data model.
This README covers getting up and running.
---
Configuration
Settings come from a TOML file. red-clippy serve reads ./red-clippy.toml by
default. Copy the example and edit:
Every field can also be set by CLI flag or en . Precedence is
CLI flag > en > TOML > built-in default, per field.
| Setting | CLI flag | En |
|---|---|---|
| bind | --bind | RED_CLIPPY_BIND |
| database_url | --database-url | RED_CLIPPY_DATABASE_URL |
| storage_root | --storage-root | RED_CLIPPY_STORAGE_ROOT |
| max_upload_bytes | --max-upload-bytes | RED_CLIPPY_MAX_UPLOAD_BYTES |
| frontend_dist | - | - |
| local_open | - | - |
| config file path | -c, --config | RED_CLIPPY_CONFIG |
Two settings are file-only:
frontend_dist o the built SPA. Release binaries embed it, so thisis normally unset; point it at a directory to serve a patched bundle without
recompiling.
local_open lets the Files page's "reveal in file manager" button shell outto
xdg-open / open / explorer.exe on the machine running the server.It ships off. Turn it on only when the server is your own desktop in a
logged-in graphical session, ne systemd or when serving remotely.
A key it does not recognise stops startup with an error rather than being
ignored, so a typo cannot silently leave you on a default.
Log filtering uses RUST_LOG (default info,sqlx=warn).
Run red-clippy ser for the full list.
> [!WARNING]
> Run it locally. Red Clippy binds to 127.0.0.1 and is meant to run on
> your own machine, next to the agent driving it. It is not built to be
> exposed to a network or the internet.
---
CLI reference
Add --help to any subcommand for its flags.
The REST API li /api/v1 and authenticates withAuthorization: Bearer rcl_<prefix>_<secret>. Keys are org-scoped, so no
endpoint takes an organization in its URL. The in-app Help page documents
the endpoints.
---
Building from source
| | |
|---|---|
| Rust | stable (1.85+), 2024 edition |
| Node.js | 20.19+ or 22.13+ (to build the web UI) |
Linux and macOS
make all builds the web UI first, then compiles the binary with that bundle
embedded.
> [!NOTE]
> Build order. The React bundle is embedded at compile time.
> Running cargo build --release on its own works, but if the UI has never
> been built the binary ships a placeholder page (cargo prints a warning).
> Run make frontend first, or just use make all.
Windows
Build natively with rustup, the MS tools, and
Node installed:
Or cross-compile from Linux using the mingw-w64 toolchain
(apt install gcc-mingw-w64-x86-64):
Copy that single .exe to the Windows host and run it. Nothing else to
install.
---
De
Debug builds read frontend/dist from disk at runtime rather than embedding
it, so you can rebuild the UI without recompiling Rust.
Before opening a pull request, run what CI runs: cargo fmt --all --check,make clippy, make test, make lint, and make frontend.make install-hooks wires the formatting and lint gates into a pre-commit
hook. See CONTRIBUTING.md for the fuller , including
how to add a parser.
Cutting a release
Bump in Cargo.toml, then push a matching tag:
CI builds a static Linux binary and a Windows executable, then publishes both
as a GitHub release with checksums. The tag must match the crate or
the build fails. To rehearse without publishing, run the Release workflow
manually from the Actions tab: it builds and uploads the archives as workflow
artifacts and skips the release step.
---
Contributing
Bug reports, parsers for new tools, and MCP co are welcome - see
CONTRIBUTING.md.
Found a security issue? Please report it pri via
SECURITY.md rather than opening an issue.
---
License
Copyright (C) 2026 Cyber Security & Privacy Foundation
Released under the GNU General Public License v3.0. This program
comes with ABSOLUTELY NO WARRANTY; see the license for details.
项目信息
开发语言:Rust
Star 数:28
技术要点
该项目属于安全软件方向的开源资源,代码结构清晰,适合安全研究人员学习参考。项目围绕open-source pentest management built to be operated by an AI agent展开,提供了可运行的实现,对理解相关安全机制、工具原理与攻防技术具有较高的研究价值。
从技术实现角度看,此类项目的核心在于对底层原理的深入理解与工程化落地。开发者在研究过程中可以结合官方文档与社区讨论,梳理项目的初始化流程、核心模块职责与数据流转,逐步掌握其中的技术细节与设计思路。
使用与学习建议
1. 下载源码压缩包,解压到本地环境。
2. 根据项目类型准备对应的运行环境与依赖。
3. 按照 README 中的步骤完成配置与部署。
4. 在隔离的测试环境中运行验证,避免影响生产系统。
免责声明
本资源来源于开源社区,仅供安全研究、技术学习与合法授权范围内的攻防演练使用,请勿用于任何非法或侵害他人权益的用途。使用本项目产生的一切后果由使用者自行承担。
| 资源标题 | red-clippy - open-source pentest management built to be operate |
| 所属分类 | 安全软件 |
| 发布作者 | admin |
| 发布时间 | 2026-10-05 22:50:59 |
| 下载权限 | 免费下载 |
| 附件数量 | 2 个下载链接 |
| 浏览次数 | 460 |
| 讨论数量 | 0 |
| 主题状态 | 正常讨论中 |