 CTF思路
点击放大
build-an-efficient-pwn-environment - How to build an efficient pwn development environm
项目说明
Build an efficient pwn de en in 2020

It has been years that, every time I determined to start learning pwn, I found that I can't write the exploits or debug the executable efficiently.
I finally decided to do something to change this situation.
So I spent some time on the usage of related tools.
I e some scripts and tools to help me with a better experience.
Now you could have a more efficient pwn de en in the year of 2020.
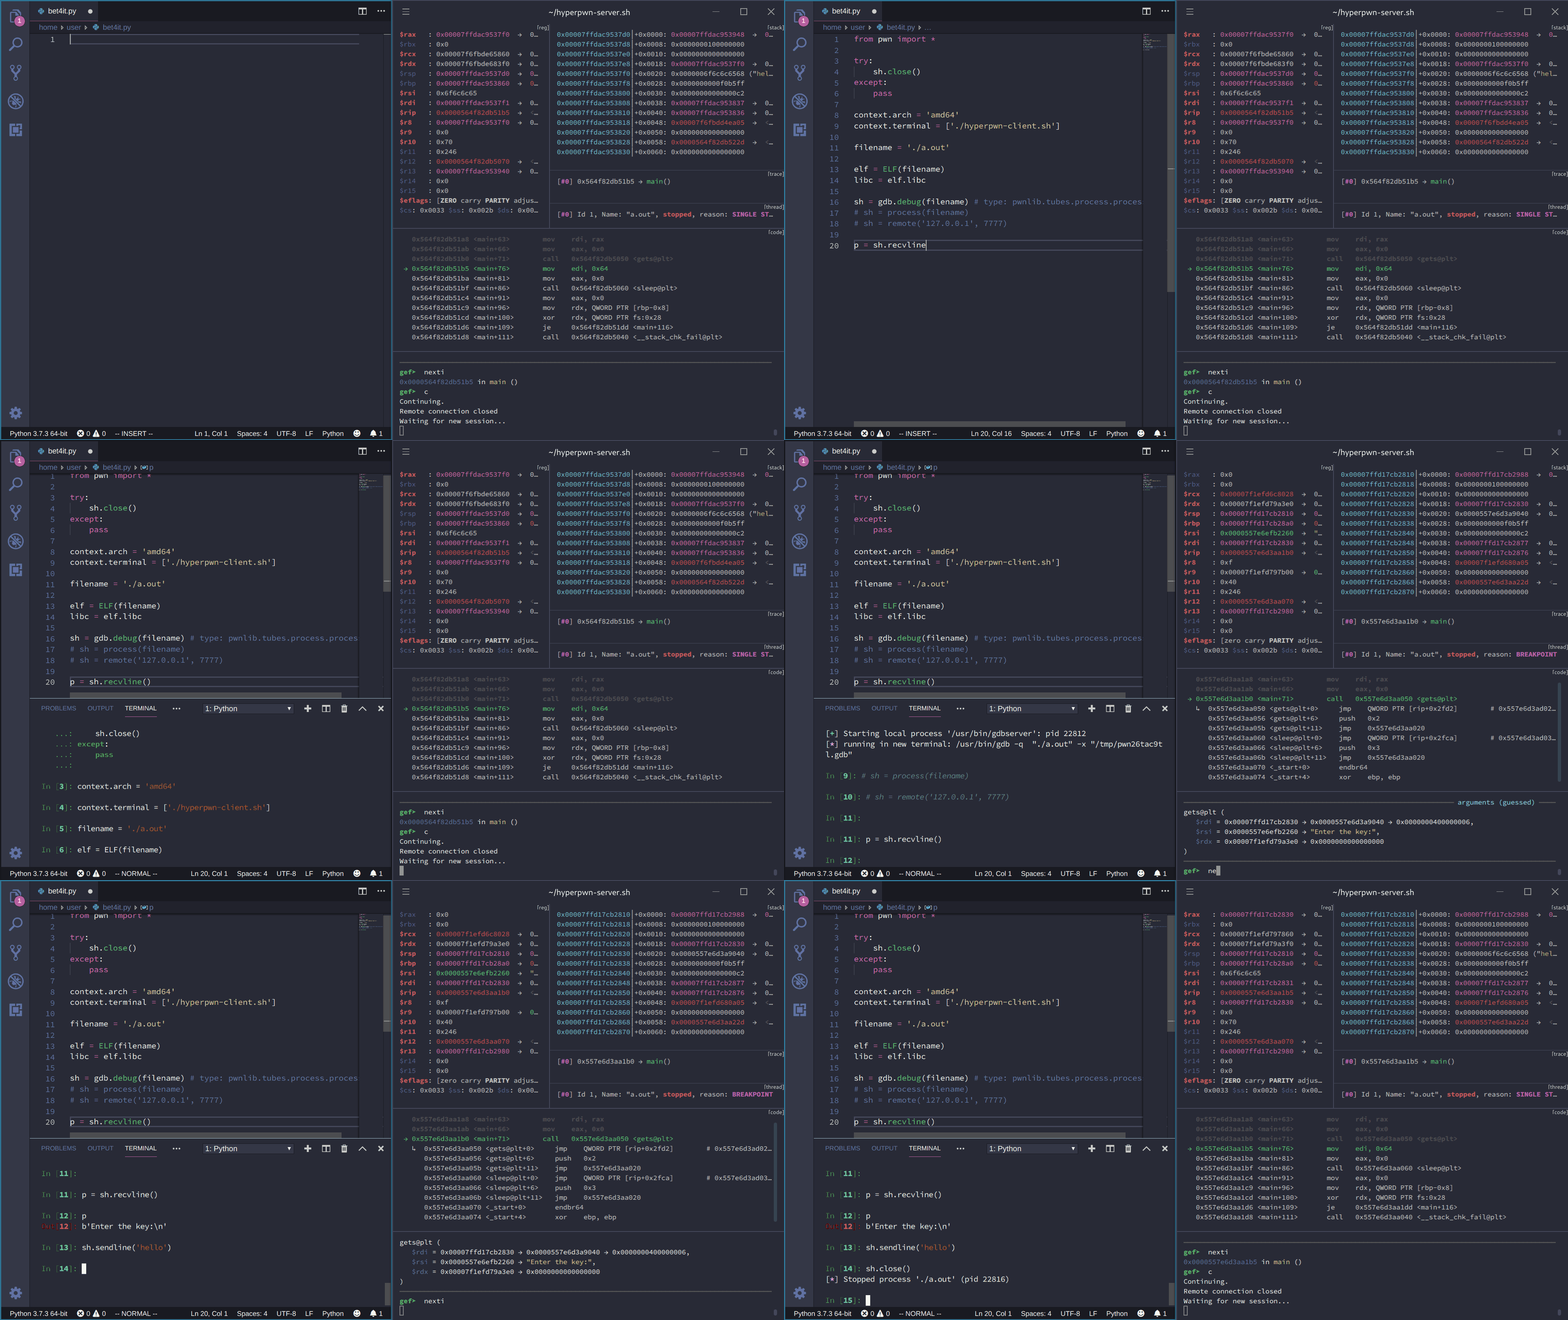
You can have a glimpse of the final en in the GIF above.
In this article, I will show you how to build this en.
Arch Linux
If you want to pwn an ELF, firstly you need a Linux distribution.
I use Arch Linux, which owns a powerful AUR to install different kinds of softwares, and all the following parts are based on it.
If you use other Linux distribution or e, you may need to find ways to install some packages on your computer. But configurations below should still be useful for you.
Or you can just switch to Arch Linux, or Manjaro if you don't want to install a Linux distribution by command line.
You may find many articles still teach you to use yaourt to install packages in AUR, but it has discontinued and is not suggested to use.
It's better to choose another AUR helper, and my suggestion is Yay.
You can install it by ways listed here.
glibc
glibc is the most important library in Linux, and when debugging we usually need to refer to some symbols in glibc, such as main_arena.
Arch Linux doesn't provide us with glibc symbols. If we need to add symbols to glibc, we must edit its PKGBUILD and add debug to options and package it by ourselves:
Notice: this step could not be necessary if you want to use the glibc same as which used on the server.
In this situation, you may need to check the en section to solve it.
GDB
The most important tool when debugging is GDB.
(Certainly, you can use LLDB if you like)
You can install it by
and if you need to debug ELF in other architectures rather than i386/x86\_64, you need to install gdb-multiarch from AUR:
But GDB itself is hard to use, you need some plugins to enhance GDB.
You may ha of peda, but today we ha choices like GEF and pwndbg, which are more powerful and in acti.
You can install them by
or
and add source /usr/share/gef/gef.py or source /usr/share/pwndbg/gdbinit.py in ~/.gdbinit to use them.
hyperpwn
Although GEF and pwndbg can help us a lot when debugging, they simply print all the context outputs to terminal and don't organize them in a layout like what have done in ollydbg and x64dbg.
You may ha of or gdb-dashboard to help this, and they can be used together with GEF or pwndbg. But that means you must disable the context function in GEF or pwndbg, which may lose some features provided by them, and although we can use some ways to automate the layout creation, it still needs manual inter.
One major drawback of tools above is that we can't easily check for previous states, which is very useful when debugging.
We need to scroll the terminal again and again and lost in huge amounts of outputs, or previous outputs may have been cleared.
Certainly, we can use reverse debugging in GDB or rr to help us, but most time we only need to have a peek of the previous state.
Some people tried to solve this problem before like this, but it was only a prototype.
I ha a new tool named hyperpwn to solve all the problems mentioned before.
hyperpwn bases on Hyper terminal, you can install it by
or you can install the git of Hyper by
then follow the steps here to install hyperpwn.
After hyperpwn is installed correctly, if you run gdb in Hyper terminal and GEF or pwndbg is loaded, a layout will be created automatically.
pwntools
The most widely used library to facilitate creating pwn script is pwntools.
pwntools depended on Python 2 before, which has reached its end-of-life now.
Now pwntools also supports Python 3. It's time for you to write exploits in Python 3!
You can install it by:
VS Code
We need a handy editor to help us write pwn scripts.
I suggest using Studio Code, which is lightweight, out-of-the-box and powerful.
You can install the open source build of VS Code by
or install the official binary by
Then you just need to install the python plugin, and you can start to write pwn scripts.
Settings
There are some settings needed to tweak to improve the experience.
You can find config file including all the settings below in settings.json.
#### Code completion
VS Code uses Jedi to do code completions.
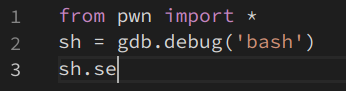
But you may find that the following code can't be completed:

Because Jedi can't detect the type of sh correctly.
We can add a type hinting to help Jedi with this:

It seems that Microsoft Python Language Server can't recognize this kind of type hinting, so if you want to ha in such situation, make sure python.jediEnabled is set to true.
#### Integrated terminal
VS Code provides us with an integrated terminal.
So when you finish your script, you don't need to leave VS Code to run it.
You can just right click in the pwn script and select Run Python File in Terminal, and the file will be executed in VS Code's integrated terminal.
You can also select Run Selection/Line in Python Terminal to send parts of your script to REPL, which will help you a lot when writing script.
As most pwn scripts are written in a single file, and may use a relative path like gdb.debug('./a.out'), it's better to let the script run in file's directory by setting python.terminal.executeInFileDir to true.
(However, this option currently doesn't affect Run Selection/Line in Python Terminal)
You can replace the default Python REPL with IPython to get a more powerful interactive REPL, by setting python.terminal.launchArgs to ["-m", "IPython", "--no-autoindent"].
In order to use Ctrl+P in terminal to select commands executed pre, you need to set terminal.integrated.commandsToSkipShell with ["-workbench.action.quickOpen"].
#### Code runner
It's a pity that Run Python File in Terminal and Run Selection/Line in Python Terminal can't be used consecutively. As Run Selection/Line in Python Terminal can't be replaced easily, we can replace the Run Python File in Terminal function with the Code Runner plugin.
Like what has been mentioned before, we need to set code-runner.fileDirectoryAsCwd to true, so the relative path to executable can be parsed correctly.
Many pwn scripts use the interactive function to interact with the shell, so we need to set code-runner.runInTerminal to true.
#### macros
When we debug pwn script, we may need to run the whole script file in REPL again and again.
Instead of boring Select all, Run Selection in Python Terminal and Cancel Selection, we can combine these steps with one shortcut.
To achive this, we need to install the macros plugin, then add this into settings.json:
And set the shortcut in keybindings.json:
Shortcuts
There are some shortcuts which are very useful when we write pwn scripts:
| Command | Keybinding |
|-----------------------------------------|---------------|
| Toggle Line comment | Ctrl + / |
| Focus into Python Script | Ctrl + 1 |
| Toggle / Focus into Integrated Terminal | Ctrl + |
| Run Selection/Line in Python Terminal | Shift + Enter |
Full keyboard shortcuts of VS Code can be found here or just press <kbd>Ctrl+K Ctrl+S</kbd> in VS Code.
You can also install the if you are familar with vim key bindings.
Cooperation
Now we have all parts needed to build a pwn en. How can we combine them together so we can get an efficient pwn en?
The key part is the cooperation of pwntools and hyperpwn.pwntools
We need when we write pwn scripts and hyperpwn to debug the executable.
pwntools provides gdb.debug function to create a debug session by a script file.gdbserver
It will start with the executable to be debugged in the background and run gdb in a new terminal to connect the gdbserver.
We can control which terminal will be chosen by setting context.terminal, e.g., ['konsole', '-e'].Hyper
However, terminal, which hyperpwn replies on, doesn't provide similar arguments.
And even Hyper provides this, it mostly means that we need to start a new Hyper terminal every time we run gdb.debug, we can't specify to run gdb in an existed terminal.
To solve this problem, I created two simple scripts, one acts as a server and the other one acts as a client.
They communicate with named pipe.
Server side script hyperpwn-server.sh which should be used in Hyper terminal:
Client side script hyperpwn-client.sh which should be set as context.terminal:
After gdb connected to gdbserver, we may find that even if we use sh.close() to shutdown gdbserver, gdb will remain there, which prevents the next session:

I created a gdb python script autoquit.py to quit gdb when the connection is closed:
That's what it looks like after source this script in ~/.gdbinit:

If you only have one monitor, you may want to put the VS Code window and the Hyper window side by side.
I created a layout of hyperpwn, so you can maximize the use of your monitor.~/.hyperinator
you can o configs in with them to enable it.
If you use GEF, you can replace ~/.hyperinator/hyperpwn-gef.yml with hyperpwn-gef.yml:
If you use pwndbg, you can replace ~/.hyperinator/hyperpwn-pwndbg.yml with hyperpwn-pwndbg.yml:
I ha a python snippet, so you can create a pwn script template with some tips mentioned before by just typing pwn.
You can use it by select File - Perference - User Snippets - Python and paste this python.json file there, and you can change it as you like:
en
One big drawback of our en is that most pwn executables are running on Ubuntu, and the of glibc is different from our en.
en can help us with this situation.
It can provide us a Ubuntu en with a low cost.
we can create a en by debootstrap, Docker or .
I prefer to use debootstrap to build a chroot en, and use schroot to enter it, which is very lightweight.
You only need less than 2GB for a specify Ubuntu .
You can install them by
For example, if you need an Ubuntu 16.04 en, you can download it by
Copy this xenial.conf into /etc/schroot/chroot.d/:
Then enter this en by
If you need other of Ubuntu, just change xenial with corresponding name.
We can enter the en's Pyhon REPL manually in VS Code's integrated terminal, the Run Selection/Line in Python Terminal function should also work well.
You may need to install pwntools in this en again, but other tools installed on the host can just be used as before.
Embedded en
Sometimes we may need to pwn a real-life program on an embedded device.
But some embedded devices use a minimal Linux en, which could not provide gdb or gdbserver for us, and it could be not easy to cross compile them as the source code of gdb is so huge.
Certainly, we can use prebuilt statically linked gdbserver compiled by others likes this, but if it can't work in your en it's hard to fix it.
To solve this problem, I de a tiny gdbserver from scratch, you can find it here.
It's very easy to compile it, all you need is a gcc that can generate ELF for the target en.
You can connect this tiny gdbserver with a normal gdb client, and most common commands needed when debugging should work.
You can even load GEF or pwndbg in gdb client, and use hyperpwn` on it, likes what have been described before.
Conclusion
In this article, I share some ways I used to build my pwn de en.
Hope it's useful for you when you build your own en.
And if you find some other ways and want to share it to others, feel free to send a pull request!
Happy hacking~
项目信息
开发语言:Shell
Star 数:269
技术要点
该项目属于CTF思路方向的开源资源,代码结构清晰,适合安全研究人员学习参考。项目围绕How to build an efficient pwn development environment in 2020展开,提供了可运行的实现,对理解相关安全机制、工具原理与攻防技术具有较高的研究价值。
从技术实现角度看,此类项目的核心在于对底层原理的深入理解与工程化落地。开发者在研究过程中可以结合官方文档与社区讨论,梳理项目的初始化流程、核心模块职责与数据流转,逐步掌握其中的技术细节与设计思路。
使用与学习建议
1. 下载源码压缩包,解压到本地环境。
2. 根据项目类型准备对应的运行环境与依赖。
3. 按照 README 中的步骤完成配置与部署。
4. 在隔离的测试环境中运行验证,避免影响生产系统。
免责声明
本资源来源于开源社区,仅供安全研究、技术学习与合法授权范围内的攻防演练使用,请勿用于任何非法或侵害他人权益的用途。使用本项目产生的一切后果由使用者自行承担。
| 资源标题 | build-an-efficient-pwn-environment - How to build an efficient pwn development environm |
| 所属分类 | CTF思路 |
| 发布作者 | admin |
| 发布时间 | 2026-10-05 23:44:55 |
| 下载权限 | 免费下载 |
| 附件数量 | 2 个下载链接 |
| 浏览次数 | 428 |
| 讨论数量 | 0 |
| 主题状态 | 正常讨论中 |