 防护思路
点击放大
swiftGuard - Anti-forensic macOS tray application designed to s
项目说明
<!--- Logo -->
<di="center">
<picture>
<source media="(prefers-color-scheme: dark)" srcset="./img/banner/banner_dark.png" width="600vw">
<source media="(prefers-color-scheme: light)" srcset="./img/banner/banner_light.png" width="600vw">
<img alt="Application Banner" src="./img/banner/banner_light.png" width="600vw">
</picture>
</div>
<br>
<!--- Badges -->
<di="center">
<a href=" >
<img src=" alt="last updated" >
<a></a>
<a href=" >
<img src=" alt="code quality" >
<a></a>
<a href=" >
<img src="
alt="commit activity" >
<a></a>
<a href=" >
<img src="
alt="stable " >
<br>
<a href=" >
<img src=" alt="open issues" >
<a href=" >
<img src=" alt="closed issues" >
<a href="#" >
<img src=" alt="repo size" >
<a href=" >
<img src=" alt="License" >
<a></a> </a> </a> </a> </a> </a> </a> </a> </a>
</div>
<!--- Title -->
<di="center">
<h1></h1>
</div>
<!--- Description -->
<di="center">
Anti-forensic macOS tray application designed to safeguard your system by monitoring USB ports.
It ensures your device's security by automatically initiating either a system shutdown or hibernation
if an unauthorized device connects or a connected device is unplugged. It offers the flexibility to whitelist
designated devices, to select an action to be executed and to set a countdown timer, allowing to disarm the
shutdown process.
<br><br>
![Donate]()
![BuyMeACoffee]()
</div>
<di="center">
<h3></h3>
</div>
<!--- Table of contents -->
Contents
- GUI
- CLI
<!--- Features -->
Features
hassle-free connectivity.
interruptions.
action (shutdown/hibernate), countdown timer and auto start.
performance.
allows community contributions for continuous de.
<!--- Screenshots -->
Screenshots
<di="center">
<picture>
<source srcset="./img/screenshots/screenshots.png" width="600vw">
<img alt="Application Screenshots" src="./img/screenshots/screenshots.png" width="600vw">
</picture>
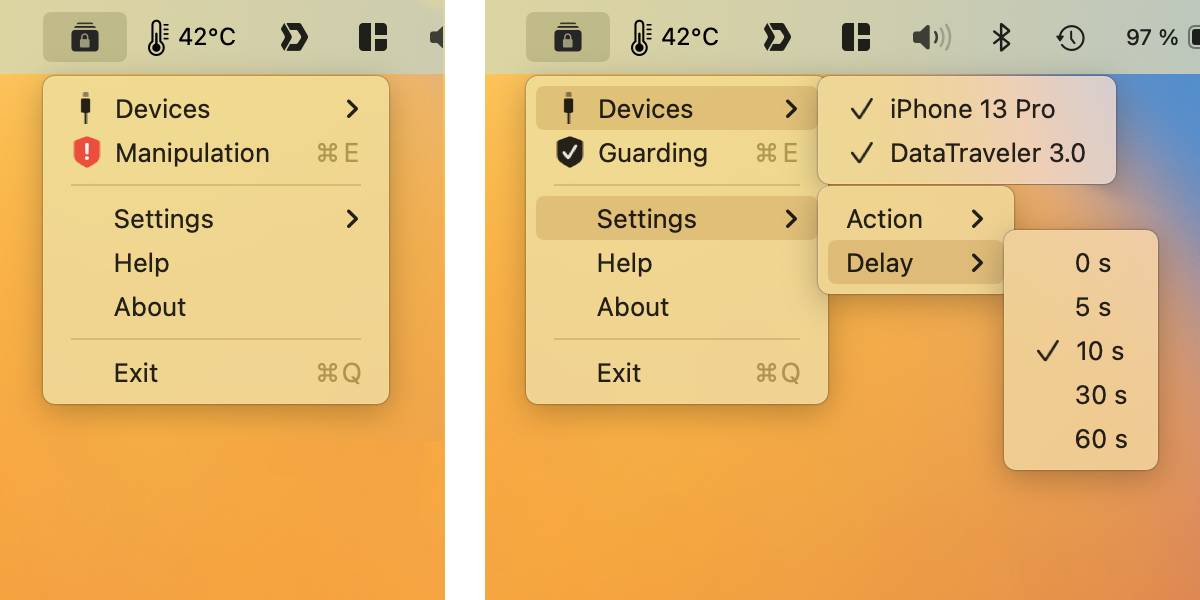
*__Left:__ Manipulation button to defuse the alarm. __Right:__ Whitelist and Settings menu.*
</div>
<br>
<!--- Why -->
Why should you care?
A few reasons to use this tool:
to prevent the screen saver or sleep mode from being activated.
acts as an additional layer of security against physical attacks in a potentially setting.
regulations. swiftGuard helps maintain compliance by pre unauthorized data transfers and access through USB ports.
> Tip: You might also want to use a cord to attach a USB key to your wrist. Then plug the key into your computer and
> run swiftGuard. If your computer is robbed, the USB is removed and the computer shuts down immediately.
<!--- Installation -->
Installation
1. Obtain the most recent by downloading it from Releases tab (Apple Silicon M1/M2/M3/M4: swiftGuard_arm64.dmg, Intel: swiftGuard.dmg).
2. Open the downloaded swiftGuard.dmg file.
3. Drag the swiftGuard application into the Applications folder.
4. Open the swiftGuard application from the Applications folder (by right-clicking and selecting Open, see Note below)
5. swiftGuard should now appear in the macOS system tray.
6. Test at least once if the shutdown or hibernation is executed correctly. On first run you will be asked to grant the necessary
permissions by macOS.
7. Automatic startup at login can be enabled in the app's settings menu.
> Important: Make sure you use FileVault, macOS's built-in disk encryption feature, to encrypt your entire disk,
> ensuring that your data remains secure even if your device falls into the wrong hands.
> Otherwise, unauthorized users may gain access to your data easily: System Preferences > Security & Privacy > Security > FileVault > Do NOT enable iCloud Recovery!
>__Note:__ If you get a warning that the application is from an _unidentified de, you have to open
>System Preferences > Security & Privacy > Security and click Open Anyway
>to allow the application to run.
See INSTALL.md for further details and instructions if you are upgrading from an older .
<!--- Usage -->
Usage
GUI
1. Open the swiftGuard application from the Applications folder.
2. Click on the application icon in the macOS system tray to open the
main menu.
3. Click the Guarding/Inactive entry to start or pause the guarding of your USB ports.
4. The Devices menu displays all allowed and connected devices. Allowed devices are indicated with a checkmark,
even if they are not connected.
5. To add or remove a device from the whitelist, simply click on the corresponding device entry.
6. If manipulation is detected, an alert (Manipulation) will appear in the main menu. Clicking on it
will reset the alarm. The Exit button will not work.
7. In the Settings menu you can set a delay (0 - 60 seconds) and an action (Shutdown or Hibernate). The delay
determines how long swiftGuard will wait for you to reset/defuse the alarm before executing the action.
>Notes:
>- swiftGuard alerts you if devices are removed that were connected before or while the application was started,
>except you add them to the whitelist.
>- Connecting new devices will always trigger an alert, if these devices are not whitelisted.
>- If you encounter any problems, please check the log file in the ~/Library/Logs/swiftGuard folder.
>- Your settings and whitelisted devices are stored in the ~/Library/Preferences/swiftGuard/swiftguard.ini file.
CLI
You can run swiftGuard as a simple Python script from the command line without a graphical user interface (GUI).
This is useful when operating swiftGuard on a headless system or saving system resources. However, you will lose the
ability to defuse the shutdown process via the GUI, but you can kill the swiftGuard process from the command line
instead. The preferences and whitelists are stored in the same location as the GUI and can be edited
manually. For further information, please refer to the src/swiftguard/cli.py file.
1. Open a terminal and na to the desired install directory.
2. Clone the repository.
3. Na to the swiftGuard directory.
4. Create a en and activate it.
5. Install poetry in the venv.
6. Install swiftguard in de mode.
This installs swiftguard and its python packages in the en venv/bin/swiftguard and venv/lib/python3.11/site-packages in de mode, so you can
change code in the src/swiftguard folder and immediately test it in the terminal.
7. Run it in CLI mode.
GUI mode: swiftguardgui
> Notes:
>
> - Settings/Whitelist: ~/Library/Preferences/swiftGuard/swiftguard.ini
> - Logs: ~/Library/Logs/swiftGuard/swiftguard.log Logs are rotated every 2 MB with a maximum of 5 files.
> You can set the log level (Debug=1, ..., Critical=5) and the log output (file, syslog, stdout; required: file) in the swiftguard.ini file.
<!--- De -->
De
As an open-source project, I strive for transparency and collaboration in my de process. I greatly
appreciate any contributions members of our community can provide. Whether you are fixing bugs, proposing features,
improving documentation, or spreading awareness - your in strengthens the project. Please review the
code of conduct to understand how we work together
respectfully.
<!--- Roadmap -->
Roadmap
| Now | Next | Later |
|----------------------------------------|------------------------------------------------------|-----------------------------|
| Unit tests | Linux support | CI/CD |
| Code quality | Bluetooth and WiFi detection (Apple Watch) | Website/Docs/Wiki |
| Custom system wide hotkey for defusing | Auto update (yet: just notifying) | Encrypted configuration |
| E-Mail notification | Nati silicon support | Code sign (Apple) |
| Countdown dialog | More actions (wipe ram, delete files/folders, email) | User defined actions |
| Passwort protected defusing (Dialog) | Translations | Professional security audit |
<!--- Security -->
Security & Code Quality
Regarding swiftGuard is a security application and therefore security is of the utmost importance. I am committed to ensuring
that it is secure and reliable for all users. I am grateful for any feedback regarding security issues and will do my best to
address them as quickly as possible. Please refer to the security policy for more information.
Additionally, I let my code be checked by several code quality and security tools (Bandit, Black, Codacy, CodeQL, PMD CPD, Prospector, Pylint, Pysa, Pyre, Trivy and Radon).
The results can be found by clicking on the badges below. These routines are no replacement for a manual code and security audit, but they help to find errors and .
Please note that the results of these tools are not always accurate and may contain false positives.
<di="center">
<a href=" >
<img src=" alt="Codacy" >
<a></a>
<a href=" >
<img src=" alt="Black" >
<a></a>
<a href=" >
<img src="
alt="CodeQL" >
<a></a>
<a href=" >
<img src="
alt="Pyre" >
<br>
<a href=" >
<img src=" alt="Pysa" >
</a> </a> </a> </a> </a>
</div>
<!-- Contributors -->
Contributors
Thank you so much for giving feedback, implementing features and improving the code and project!
<a href = "
<img src = "
</a>
<!--- Credits -->
Credits
This application is heavily inspired and based on project
usbkill by Hephaestos and BusKill by Michael Altfield.
I want to thank him and all the other great contributors of usbkill for
their great work, inspiration and help. I firmly believe in the
principles of the open source community, which call for the sharing and
enhancement of one another work. The purpose of this project is to
revive an abandoned project and to support others in learning and
comprehending the fundamentals of Python, Qt and macOS, and to develop
their own projects.
Many more credits are in the acknowledgments file.
<!--- License -->
License
Provided under the terms of the GNU GPL3 License © Lennart Haack 2023.
See LICENSE file for details.
For the licenses of used third party libraries and software, please refer to the ACKNOWLEDGMENTS file.
项目信息
开发语言:Python
Star 数:470
技术要点
该项目属于防护思路方向的开源资源,代码结构清晰,适合安全研究人员学习参考。项目围绕Anti-forensic macOS tray application designed to safeguard your system by monitoring USB ports.展开,提供了可运行的实现,对理解相关安全机制、工具原理与攻防技术具有较高的研究价值。
从技术实现角度看,此类项目的核心在于对底层原理的深入理解与工程化落地。开发者在研究过程中可以结合官方文档与社区讨论,梳理项目的初始化流程、核心模块职责与数据流转,逐步掌握其中的技术细节与设计思路。
使用与学习建议
1. 下载源码压缩包,解压到本地环境。
2. 根据项目类型准备对应的运行环境与依赖。
3. 按照 README 中的步骤完成配置与部署。
4. 在隔离的测试环境中运行验证,避免影响生产系统。
免责声明
本资源来源于开源社区,仅供安全研究、技术学习与合法授权范围内的攻防演练使用,请勿用于任何非法或侵害他人权益的用途。使用本项目产生的一切后果由使用者自行承担。
| 资源标题 | swiftGuard - Anti-forensic macOS tray application designed to s |
| 所属分类 | 防护思路 |
| 发布作者 | admin |
| 发布时间 | 2026-10-06 00:07:48 |
| 下载权限 | 免费下载 |
| 附件数量 | 2 个下载链接 |
| 浏览次数 | 520 |
| 讨论数量 | 0 |
| 主题状态 | 正常讨论中 |