项目说明
BF-IDS Project Proposal
Project Title: BF-IDS: Beha Fingerprinting-Augmented Embedded Intrusion Detection System with Real-Time Dashboard
Course: MICROPROCESSOR AND EMBEDDED SYSTEM
Program: BSc in CSE
Team: Sagar Biswas (The project is not finalized yet. If it remains that way, I will proceed with it as a solo project in future).
Supervisor: Md Sajid Hossain
Semester: 2025-2026, Spring
<di="right">
![Build / CI]()

![Open Issues]()
![Closed Issues]()
![Docs]()
</div>
---
> Status: Proposal + design documentation. This repository contains the proposal text and diagrams (no BF-IDS implementation code yet).
Quick links
Docs (GitHub Pages): Original baseline proposal (Mini-IDS v1): Mini-IDS_Personal_Project_Proposal.pdf / Mini-IDS_Personal_Project_Proposal.docxDiagrams: docs/assets/Document (included in this repo)
v1 — Mini-IDS (original draft): Raspberry Pi IDS with rule-based + lightweight anomaly detection, dashboard, alerts, and basic firewall/GPIO response.v2 — BF-IDS (this document): Adds per-device beha fingerprinting (Isolation Forest), optional ESP32 satellite nodes over MQTT, and expanded e + diagrams.<details>
<summary>Table of contents</summary>
1. Executi2. Objectives3. System O4. Detection Design5. Implementation Plan and Technologies6. Testing and E7. Safety and Ethics8. Deli9. Timeline (8 Weeks)10. Risk Analysis and Mitigation11. Budget Estimate12. Repository Layout13. Architecture Diagram14. Sequence Diagram15. Fingerprint Engine: Internal Design16. Limitations and Future Work17. Glossary (Important Terms)18. Project De Note</details>
1. Executi
This project proposes a low-cost, practical, and novel Beha Fingerprinting-Augmented Embedded Intrusion Detection System (BF-IDS) built on a Raspberry Pi 4 with optional ESP32 satellite nodes. The core idea is simple: instead of only relying on fixed rules or known attack signatures, the system also learns the normal behavior of every device on the network and raises an alert when something starts acting differently than usual.
Most existing IDS tools like Snort or Suricata work by matching traffic against a database of known attack patterns. That works fine for known attacks, but it completely misses new or zero-day attacks. Our system adds a beha fingerprinting layer on top — each device builds a profile of its own traffic habits over time, and any unexpected de from that profile triggers an alert, even if no matching signature exists.
On top of that, the system supports distributed monitoring through ESP32 nodes that connect back to the Raspberry Pi master over MQTT. This makes it possible to monitor multiple network segments at once using cheap hardware.
The proposed system is designed to capture network traffic in real time, send alerts and eb-based dashboard. The focus is on making a working, reproducible, and well-documented system that can be tested and e properly.
---
2. Objectives
Build a reliable packet capture pipeline on an embedded platform using C and libpcap.Detect common attacks such as port scans, ICMP floods, brute-force login attempts, and sudden traffic spikes using rule-based detection.Build a per-device beha fingerprint profile from li traffic, tracking features like packet size distribution, protocol ratios, acti cycles, and dominant destinations.Detect zero-day and stealthy attacks purely by spotting beha de from a device's own normal profile — no pre-written signatures needed.Support distributed monitoring using ESP32 satellite nodes that send traffic data to the Raspberry Pi master over MQTT.Send real-time alerts and Automatically block malicious IPs using iptables with proper fail-safes to avoid false blocks.Provide a Flask-based li with per-device fingerprint , event logs, and an admin control panel.E performance honestly — detection rate, false positive rate, latency, and resource usage — and document e in a reproducible way.---
3. System O
The entire system runs on a Raspberry Pi 4 as the central node. ESP32 boards act as optional satellite nodes that monitor remote network segments and forward data over MQTT.
The main modules are:
Packet capture module written in C using libpcap — handles raw packet capture at low latency.Lock-free ring buffer — safely passes packets from the capture thread to Python worker processes without slowing down.Preprocessing worker — extracts flow features and per-device traffic statistics from raw packets.Beha Fingerprint Engine — builds and maintains a traffic behavior profile for every device seen on the network. Detects de in real time using Isolation Forest.Detection engine — combines rule-based detection, statistical anomaly detection (EWMA, z-score), and beha fingerprint de scoring.Response manager — blocks IPs , fires alerts, controls LED and buzzer over GPIO.SQLite database — stores event logs, device fingerprint profiles, and configuration.Flask dashboard with WebSocket updates — shows li, per-device behavior, and admin controls.MQTT node manager — collects data from ESP32 satellite nodes and feeds it into the main pipeline.Updated data flow:
---
4. Detection Design
Rule-Based Detection
Port scan: triggered when a single source IP probes too many unique destination ports within a sliding time window.ICMP flood: triggered when ICMP packets per second from a source goes above a configurable threshold.Brute-force login: detected by repeated failed HTTP POST login attempts from the same IP within a short window.Suspicious traffic spike: triggered when the packet rate de from the EWMA baseline by more than K standard de.Statistical Anomaly Detection
Entropy checks on packet payload distributions for common protocols.Per-IP z-score on packet size and packet rate to catch outlier behavior.Optional lightweight streaming model if time allows.Beha Fingerprinting Engine (New — Core Novelty)
This is the main thing that makes BF-IDS different from a regular IDS.
Every device on the network has a "traffic personality" — its own normal habits. A smart bulb mostly just sends tiny status packets. A laptop has traffic but follows a certain rhythm. A security camera continuously streams data to specific destinations. These patterns are unique to each device.
The Beha Fingerprint Engine learns these patterns during a training window and then monitors for de in real time. The features tracked per device are:
An Isolation Forest model is trained on these features per device. When a device's li score as anomalous against its own profile, the engine raises a beha alert. This catches things like:
A smart plug suddenly starting port scanning (device compromise)A camera streaming to a new unknown destination (data exfiltration)A device suddenly changing from mostly TCP to mostly UDP traffic (tunneling)A device staying active at unusual hours when it is normally idleThe key ad here is that none of this needs prior knowledge of the attack. It works even on encrypted traffic because we are looking at traffic metadata, not payload content.
False Positi
Whitelist known trusted hosts that should never be blocked.Require agreement from at least two independent detectors (for example, both rule engine and fingerprint engine) before auto-blocking.Beha alerts below a configurable confidence score are logged but do not trigger auto-block.Admin can manually o and unblock IPs from the dashboard.A device that shows unusual behavior during a known maintenance window can be temporarily put into obser mode.---
5. Implementation Plan and Technologies
Packet Capture:
C + libpcap for the hot path — this is the fastest way to grab packets on LinuxCore Processing:
Python 3.11 with multiprocessingscikit-learn — Isolation Forest for beha fingerprint anomaly scoringnumpy and pandas — feature management and statistical calculationsjoblib — saving and loading trained fingerprint models on the Raspberry PiDistributed Nodes:
ESP32 firmware written in Arduino C++ with FreeRTOSMQTT protocol for ESP32 → Raspberry Pi communicationMosquitto broker running on the Raspberry PiDashboard:
Flask + Flask-SocketIOChart.js — li charts and per-device fingerprint Storage:
SQLite — event logs, device fingerprint profiles, configurationRedis (optional) — ephemeral counters for high-speed rule checkingTesting Tools:
nmap, hping3, tcpreplay — for simulating attacksCustom Python scripts for replaying pcap filesDeployment:
systemd service for auto-start on bootOptional Dockerfile for easy reproducibility on other machines---
6. Testing and E
Planned tests:
Unit tests for each rule detector and the fingerprint de scorerIntegration tests for the full pipeline from capture to responseBeha fingerprint tests — train on benign traffic, then introduce attack traffic and measure detectionStress tests to measure packet loss, CPU, and memory under high loadFalse positi using hea traffic with no attacksKey metrics:
Detection rate and false positive rate — both for rule-based and beha detectionMean time from packet arrival to alert generationMean time from alert to IP blockCPU and RAM usage under normal and stressed conditionsPacket loss rate in the capture pipelineTarget goals:
Detection latency under 2 secondsFalse positive rate under 5% on benign benchmark trafficPacket loss below 1% at the target packet-per-second baselineBeha fingerprint detection rate above 80% for device compromise scenarios---
7. Safety and Ethics
All testing will be done in a private, controlled lab network. No tests will be run on any network or device without explicit permission. Log data released publicly will be anonymized before sharing. The threat model document will explain what the system is and is not designed to defend against. Responsible testing procedures will be documented in the final report.
---
8. Deli
Full source code with modular layout, unit tests, and integration testsTrained fingerprint models and training scripts for lab en reproductionDockerfile and systemd service scriptArchitecture and sequence diagramsTest scripts, recorded pcap files, and traffic simulation scriptsPerformance and e report with graphs5–7 minute demo video and presentation slidesVi with likely questions and answers---
9. Timeline (8 Weeks)
Week 1: En setup, capture module prototype in C, ring buffer implementation and testWeek 2: Preprocessing worker and feature extractor; write test traffic simulation scriptsWeek 3: Implement core rule-based detection and unit tests; start passi data collection from lab devicesWeek 4: Implement statistical anomaly detectors (EWMA, z-score); build beha profile builder and train initial Isolation Forest modelsWeek 5: Response manager, iptables automation, GPIO alert integration; set up MQTT broker and ESP32 node firmwareWeek 6: Dashboard de with admin controls and per-device fingerprint panelsWeek 7: Full stress testing, fingerprint model tuning, false positive rate benchmarking, threshold calibrationWeek 8: Documentation, demo recording, final report writing, presentation prep---
10. Risk Analysis and Mitigation
Packet loss under high load: mitigated by the C-based capture thread and lock-free ring buffer design; Python workers run separately and do not block the capture pathBeha false positi device updates or restarts: mitigated by putting devices into obser mode during known changes; configurable cool-down period before auto-blockingFingerprint model drift over time: mitigated by a scheduled re-training window and manual re-train option from the dashboardFalse positives from rule-based detectors: mitigated by requiring correlation across two detectors before triggering auto-blockSD card corruption or Pi crash: mitigated by read-only rootfs option, regular config backups, and a hardware watchdog on the ESP32 that can restart the Pi if neededESP32 node going offline: the main system continues operating; offline nodes are logged and shown on the dashboard---
11. Budget Estimate
Raspberry Pi 4 (4 GB recommended): 10,000 – 15,000 BDTESP32 De (for satellite node and/or GPIO controller): 800 – 1,500 BDTMicroSD card and accessories: ~1,000 BDTNo paid services are required. GeoLite2, Mosquitto MQTT broker, and all notification APIs used are free at the basic level.
Why ESP32?
Built-in WiFi and Bluetooth make it easy to connect wirelessly to the main PiDual-core processor and FreeRTOS support allow running MQTT client and sensor tasks in parallelMultiple GPIO pins a for LED, buzzer, and other hardware alertsVery cheap and widely a in BangladeshCan act as a hardware watchdog to restart the Pi if the main system hangsWith MQTT, multiple ESP32 nodes can monitor different network segments and report to one central PiESP32 Roles in This Project
Satellite IDS node — monitors a separate network segment and sends traffic summaries to the Pi over MQTTDedicated GPIO alert controller — handles LED and buzzer alerts independently from the PiHardware watchdog — restarts the Pi if a heartbeat signal is missedOptional future extension: add more ESP32 nodes to build a fully distributed IDS mesh---
12. Repository Layout
Current repository contents (this proposal repository)
Planned implementation repository layout (future work)
---
13. Architecture Diagram
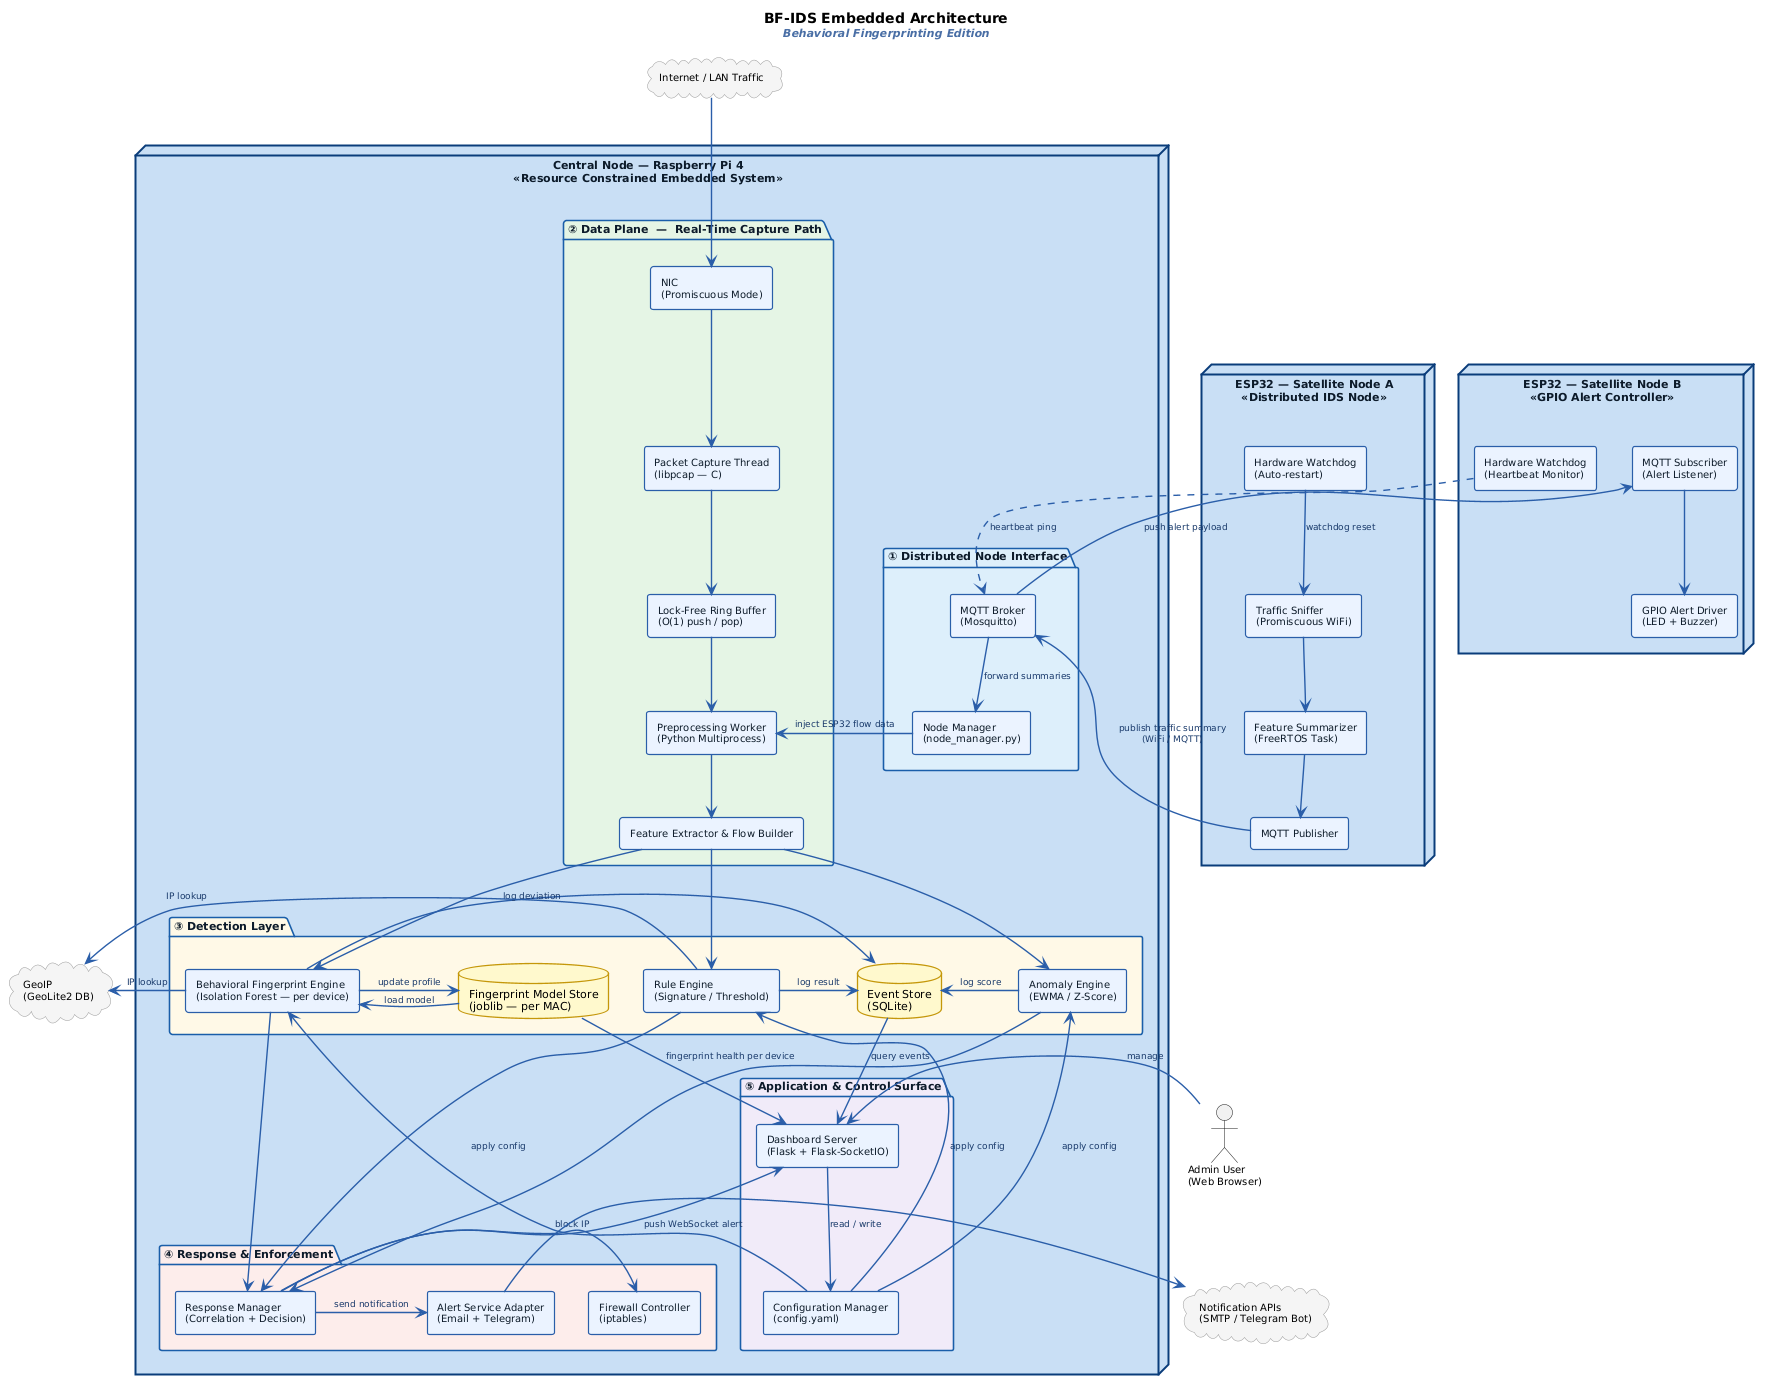
Below is the architecture diagram for BF-IDS. It shows the Raspberry Pi as the central node, the ESP32 satellite nodes, all processing modules, and how they connect together.
!BF-IDS architecture diagram
Diagram Summary
Think of the system like a security office that watches over a whole building with multiple checkpoints placed at different doors.
Checkpoints (ESP32 Satellite Nodes): Each ESP32 is placed at a different part of the network, like a guard at a separate door. Node A sniffs WiFi traffic in promiscuous mode, summarizes what it sees, and sends reports back to the main office over MQTT. Node B acts as a dedicated hardware alert controller — it listens for alert signals over MQTT and triggers an LED or buzzer when something is detected. Both nodes have a built-in hardware watchdog that can automatically restart themselves or ping the Pi to confirm the system is still alive.Main office (Raspberry Pi 4): This is the central processing hub. All traffic — both from its own NIC and from ESP32 nodes via MQTT — arrives here and goes through the full detection pipeline.Front desk (NIC + libpcap capture thread): The NIC runs in promiscuous mode, meaning it picks up all packets on the network, not just its own. The C-based capture thread grabs each packet the moment it arrives. It is written in C specifically because Python would be too slow for this part.Conveyor belt (lock-free ring buffer): The captured packets are immediately pushed onto a ring buffer — a fast, shared memory structure that lets the C capture thread and the Python workers exchange data without stepping on each other. It is designed for O(1) push/pop without locks; under sustained o, the pipeline still needs a clear policy (drop, backpressure, or sampling) to avoid unbounded queueing.Records clerk (preprocessor + feature extractor): A Python worker pulls packets off the buffer and extracts useful information — who sent it, where it was going, what protocol, how big it was, how often packets like this arrive. This becomes the input to all three detection engines.Three detection engines running in parallel: - The
Rule Engine checks for known bad patterns like port scanning, ICMP floods, and brute-force login attempts.
- The
Anomaly Engine tracks statistical baselines using EWMA and z-score and flags sudden de.
- The
Beha Fingerprint Engine is the new and core part of this system. It has learned what normal traffic looks like for every device on the network. If any device starts behaving differently — talking to new destinations, changing its protocol mix, waking up at odd hours — the engine notices and scores the de using an Isolation Forest model.
Storage: The Event Store (SQLite) logs all detection results and configuration. The Fingerprint Model Store holds the trained Isolation Forest model for each device, saved and loaded by MAC address.Incident response team (Response Manager): When the detection engines raise an alert with enough confidence, the response manager steps in. It tells the firewall to block the attacker IP using iptables, sends an alert message or Control room (Dashboard + Configuration Manager): The admin sees e live — per-device fingerprint health, acti, blocked IPs, and system resource usage. Thresholds, whitelists, and fingerprint sensitivity can all be changed from the dashboard without restarting anything.External services like GeoIP (GeoLite2) and notification APIs (SMTP, lled when needed and are never in the critical detection path.---
14. Sequence Diagram
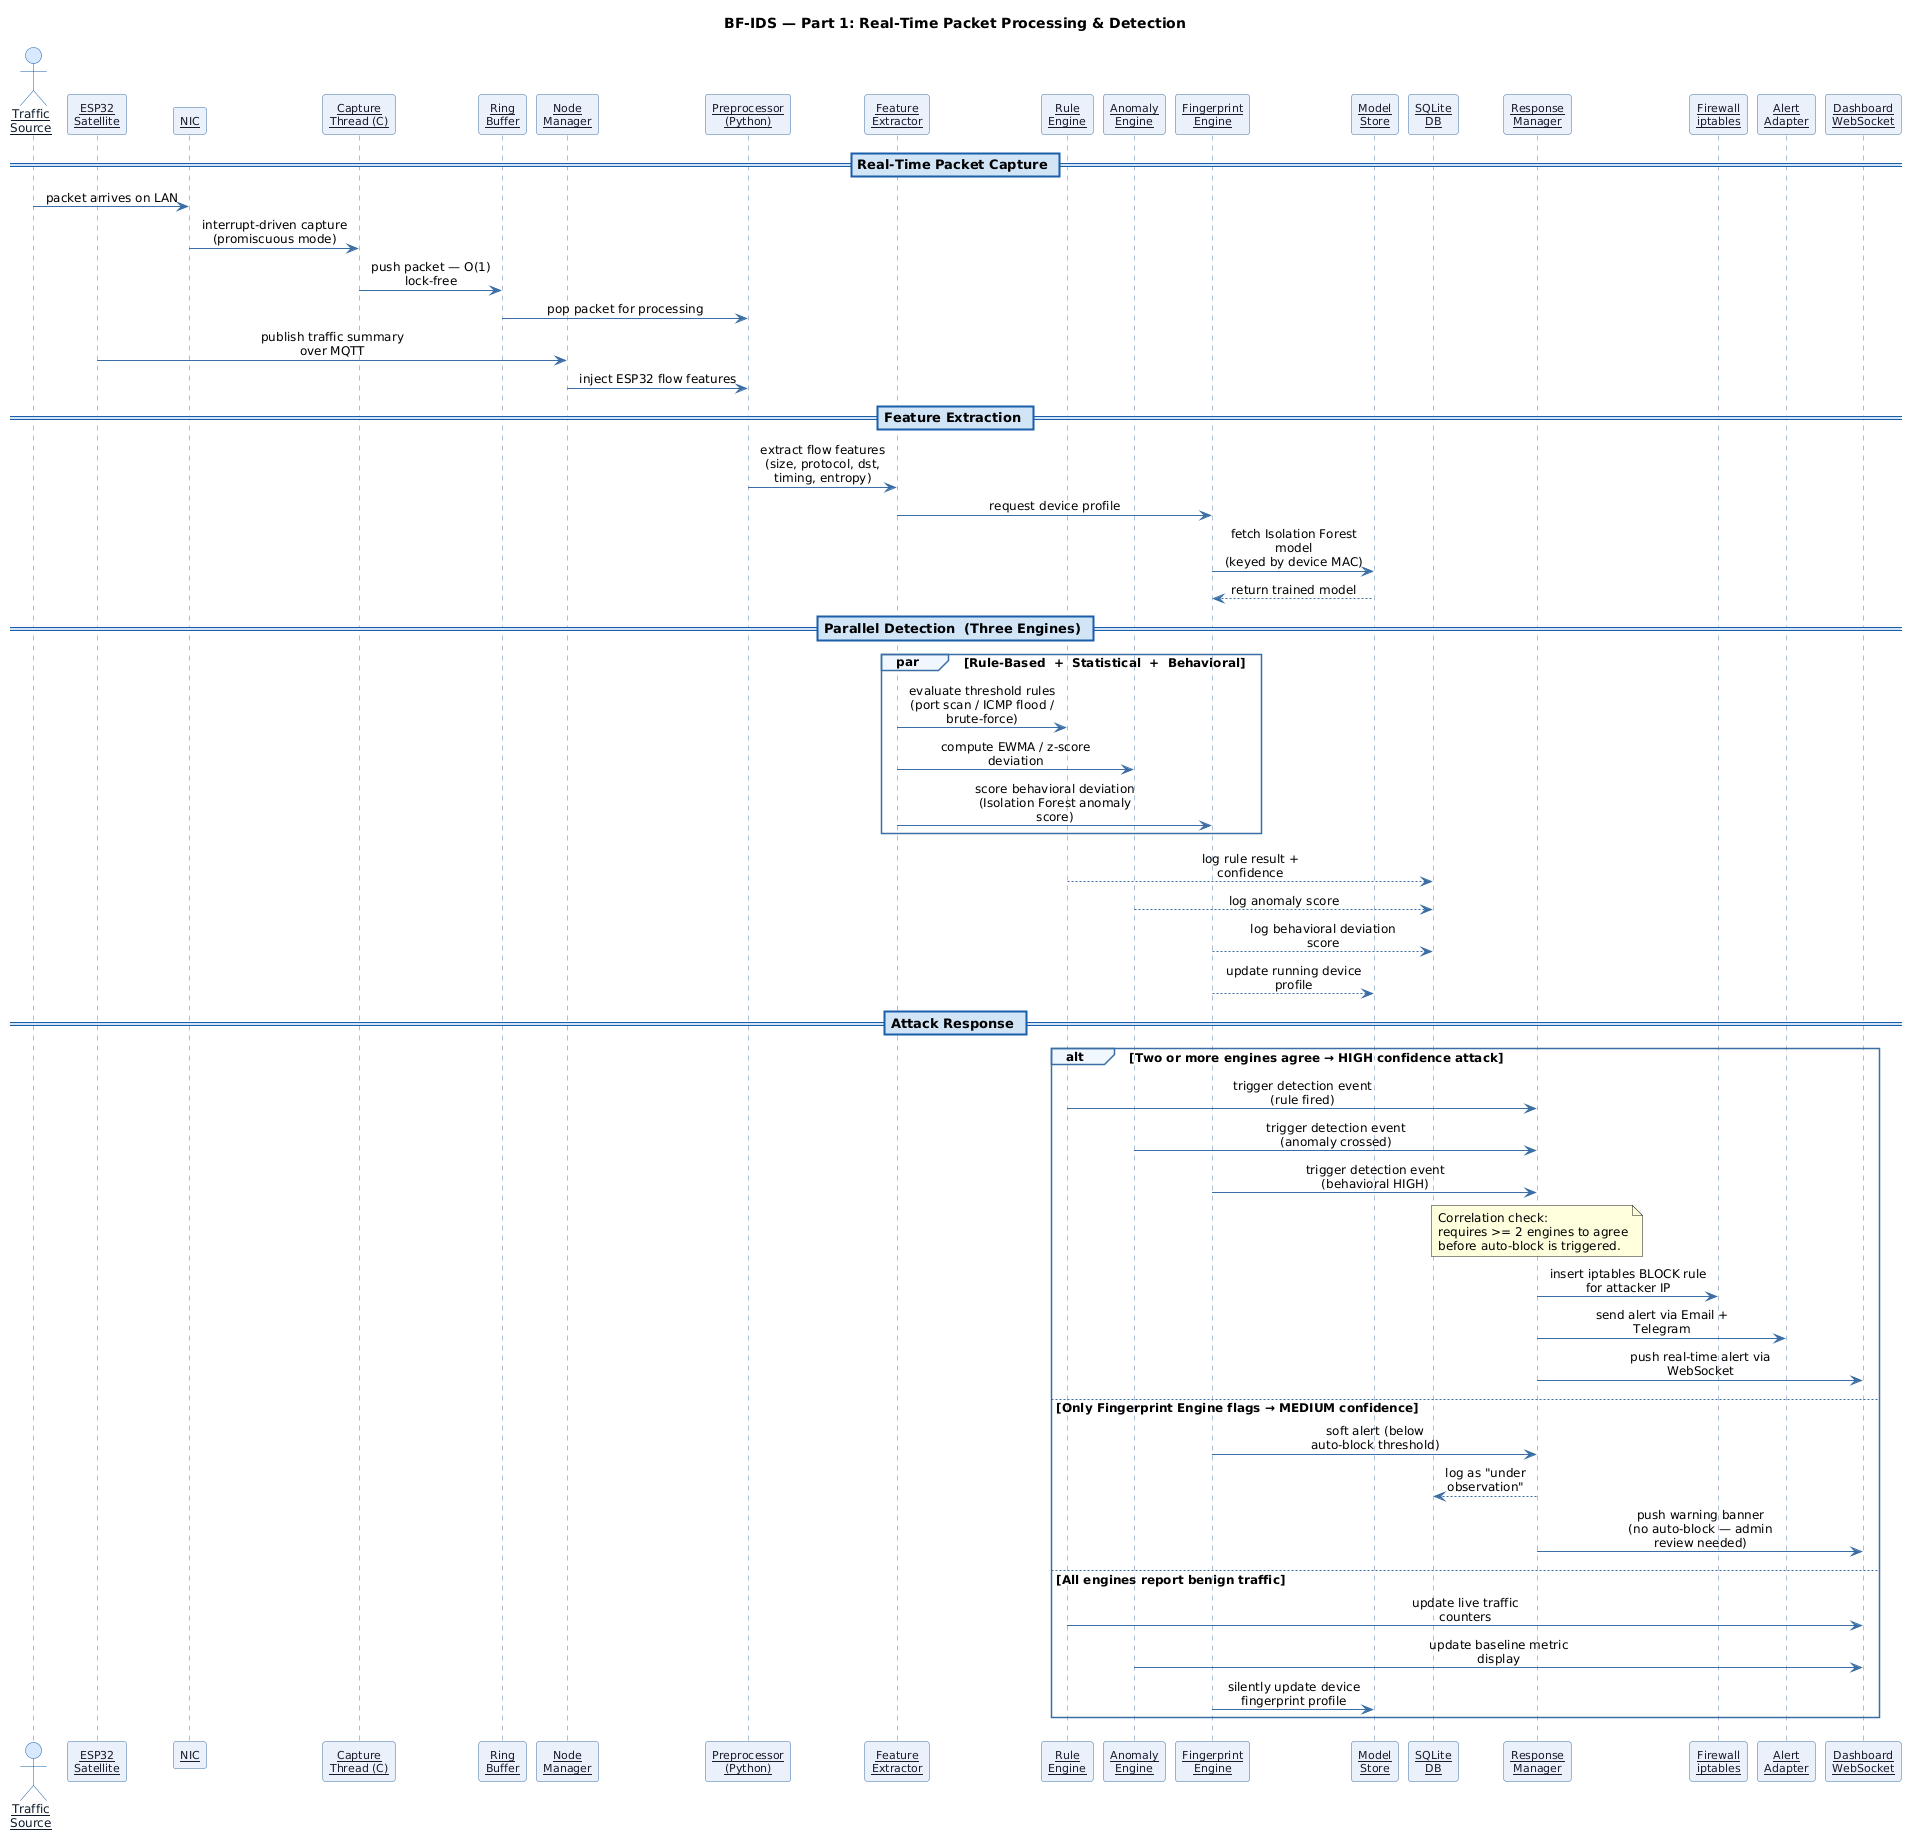
Part 1 — Real-Time Packet Processing and Detection
This diagram shows what happens from the moment a packet arrives on the network until a detection decision is made.
!BF-IDS sequence diagram part 1
Diagram Summary
Packet capture: A packet arrives at the NIC. The libpcap capture thread captures it in a low-latency loop and pushes it into the ring buffer in O(1) time, then it is picked up by the Python preprocessor. If an ESP32 satellite node also detected something, the Node Manager injects that data into the same preprocessing pipeline.Feature extraction: The preprocessor sends the packet data to the Feature Extractor, which builds a feature snapshot for that device — size, protocol, destination, timing, entropy. The Feature Extractor also asks the Fingerprint Engine to load the trained Isolation Forest model for that device from the Model Store.Three engines run in parallel: - The Rule Engine checks for known attack patterns.
- The Anomaly Engine computes EWMA and z-score de from baseline.
- The Fingerprint Engine scores how much the current traffic de from the device's normal beha profile.
- All three log their results to SQLite. The Fingerprint Engine also updates the running device profile in the Model Store.
Three possible outcomes: - If two or more engines agree there is an attack, the Response Manager is triggered with high confidence. It blocks the IP in iptables, sends an alert and
- If only the Fingerprint Engine flags something, it is treated as a medium-confidence beha anomaly. A warning is logged and shown on the dashboard, but no auto-block happens — the admin needs to review it first.
- If all engines report normal traffic, the dashboard counters are updated silently and the device profile is refreshed.
Part 2 — Admin Control, Fingerprint Training and Node Health
This diagram covers the management side of the system — what the admin can do, how fingerprint models are trained, and how ESP32 nodes are monitored.
!BF-IDS sequence diagram part 2
Diagram Summary
Admin response to a medium alert: When the dashboard shows a beha warning, the admin can either confirm it as suspicious (which triggers a manual IP block in iptables and logs the action) or dismiss it as a false positi adds the device to the whitelist and relaxes the fingerprint threshold for that device).Fingerprint profile training: Training can be triggered manually by the admin or run automatically on a schedule. When triggered, the Fingerprint Engine pulls historical benign traffic records for the target device from SQLite, fits a new Isolation Forest model on those feature , and saves the updated model to the Fingerprint Model Store keyed by the device's MAC address. A training summary with model accuracy is shown on the dashboard.ESP32 satellite node health check: Every 30 seconds, each ESP32 node sends a heartbeat ping to the Node Manager. The Node Manager updates the node's last-seen timestamp in SQLite and refreshes the status indicator on the dashboard. If a node misses three consecuti, the Node Manager pushes a node-offline event to the dashboard, which then notifies the admin. The main detection system continues running normally — losing a satellite node does not stop anything.Admin configuration changes: From the dashboard the admin can update detection thresholds, add trusted hosts to the whitelist, or unblock a pre blocked IP. All changes are pushed live to the Rule Engine, Anomaly Engine, and Fingerprint Engine without restarting the system. E is persisted to SQLite so the settings survive a reboot.---
15. Fingerprint Engine: Internal Design
This diagram shows how the Beha Fingerprint Engine processes each device's traffic internally, including the learning phase for new devices and the de scoring phase for known devices.
!BF-IDS fingerprint engine diagram
Diagram Summary
The Fingerprint Engine works in two completely different modes depending on whether it has seen a device before.
Feature Extractor lane: Every packet that passes through the preprocessor produces a feature for its source device. This includes eight features: a packet size, packet size standard de, protocol ratio (TCP vs UDP vs ICMP), dominant destinations, inter-arrival time, bytes per hour, sleep/wake pattern, and new destination rate. This is handed off to the Fingerprint Engine.For a known device (profile already exists): - The engine loads the trained Isolation Forest model from the Model Store using the device's MAC address as the key.
- It scores the li against the trained profile.
- The de score is normalized for dashboarding (e.g., 0.0 = normal, 1.0 = highly anomalous); the exact calibration/thresholding is part of the e and tuning plan.
- If the score is above the HIGH threshold, the alert level is set to HIGH — this likely means the device is compromised or under acti.
- If the score is above the MEDIUM threshold but below HIGH, the alert level is set to MEDIUM — the behavior is unusual and needs a human to review it.
- If the score is normal, the alert le NONE and the running profile statistics are updated using a sliding window so the model stays fresh.
For a new or unknown device (no profile yet): - The engine enters Learning Mode and starts collecting clean traffic for the device.
- The default training window is 30 minutes, but this can be changed from the admin dashboard.
- During the training window, all feature are accumulated in a temporary in-memory buffer. No scoring happens during this phase, so no false alerts are raised for new devices.
- Once the training window is complete, a new Isolation Forest model is fitted on the collected feature , saved to the Model Store, and the device is marked as PROFILED.
- From that point on, the device is treated as a known device and de scoring begins.
Response Manager lane: - If alert_level is HIGH, the result is forwarded to the Response Manager with a high confidence flag. Auto-blocking is eligible, but still requires at least two engines to agree before it actually happens.
- If alert_level is MEDIUM, a soft alert is sent directly to the Dashboard. The admin is notified and can review it, but nothing is blocked automatically.
- If alert_level is NONE, the engine simply returns control back to the Feature Extractor so it can process the next incoming packet.
---
16. Limitations and Future Work
Current Limitations
Tested in a controlled lab en only — real-world internet traffic is much noisier and would need more careful threshold tuning.The beha fingerprint models need a clean training period with only normal traffic. If attack traffic is mixed into the training window, the profiles will be wrong.Isolation Forest works well but is not the most powerful anomaly detection algorithm. It was chosen because it runs on a Raspberry Pi without killing performance.Raspberry Pi 4 is still resource-limited. Very high traffic rates (above a few hundred Mbps) will likely cause packet loss.ESP32 nodes are passi right now — they do not make blocking decisions themselves. All enforcement is centralized on the Pi.Future Work
Replace Isolation Forest with a more powerful streaming model like RRCF (Robust Random Cut Forest) which is specifically designed for time-series anomaly detection.Add DNS tunneling and TLS fingerprinting detection as new rule modules.Build a proper distributed enforcement mode where ESP32 nodes can block traffic locally using their own GPIO-connected relay modules.Add attack heatmaps and longer trend history to the dashboard.Test the system against real-world benchmark datasets like UNSW-NB15 or CIC-IoT-2023 to get proper academic e numbers.Explore running a tiny quantized ML model directly on the ESP32 for on-device beha scoring without needing to report back to the Pi.---
17. Glossary (Important Terms)
#### ICMP Flood
What: An attack that sends a massi of ICMP ping packets to o a target.Why relevant: One of the most common and easy-to-launch DoS attacks. Easy to simulate in a lab and easy to detect with a simple packets-per-second rule.#### Traffic Spike
What: A sudden sharp increase in traffic over a short time.Why relevant: Can be normal (a software update started) or malicious (a DDoS attack starting). Context is important — this is exactly the kind of thing EWMA helps distinguish.#### libpcap
What: A C library that lets programs capture raw network packets directly from a network interface at the kernel level.Why relevant: It is the standard tool for packet capture on Linux. We use it in the capture module because it is much faster than Python-based alternatives.#### Lock-Free Ring Buffer
What: A circular memory buffer where producers and consumers can operate without using locks or mutexes.Why relevant: Locks slow e down when there is high-speed packet capture happening. A lock-free design lets the capture thread and the Python workers run at full speed without blocking each other.#### Beha Fingerprinting
What: The process of building a unique traffic profile for a device based on how it normally behaves on the network — what protocols it uses, where it talks, how much data it sends, when it is active.Why relevant: This is the core novelty of BF-IDS. It allows detection of compromised or misbehaving devices without needing to know what the attack looks like in advance.#### Isolation Forest
What: A machine learning algorithm designed specifically for anomaly detection. It works by randomly partitioning the data and checking how easy it is to isolate a specific data point — anomalies get isolated quickly.Why relevant: It is lightweight, works well with small training sets, and runs fast enough on a Raspberry Pi. Perfect for scoring beha de in real time.#### MQTT
What: A lightweight publish-subscribe messaging protocol designed for constrained devices and low-bandwidth networks.Why relevant: ESP32 satellite nodes publish their traffic summaries to MQTT topics. The Raspberry Pi subscribes and processes them. It is the glue between the distributed nodes and the central system.#### EWMA
What: Exponential Weighted Moving A — a running a that gives more weight to recent and less to older ones.Why relevant: Helps track a "normal" baseline for packet rate per device. If the current rate shoots up far above the EWMA baseline, it is flagged as suspicious.#### z-score
What: A number that says how many standard de a value is from the mean.Why relevant: Used to detect statistically unusual behavior, like a device suddenly sending packets that are much larger or smaller than usual.#### GPIO Pins
What: General Purpose Input/Output pins on the Raspberry Pi or ESP32 that can be programmed to either read a signal or output a signal.Why relevant: Used to control physical hardware like an LED or buzzer that provides a and audible alert when an attack is detected.#### UART
What: A serial communication method using two wires — TX (transmit) and RX (receive) — for sending data between two devices.Why relevant: Can be used to connect Raspberry Pi and ESP32 as a simple and reliable communication link for sending alert signals.#### I2C
What: A two-wire communication protocol (SDA for data, SCL for clock) that supports multiple devices on the same bus.Why relevant: Reduces wiring complexity when multiple sensors or modules need to connect to the Pi at the same time.#### Distributed IDS Node
What: A separate device that independently monitors its own network segment and reports findings to a central system.Why relevant: Makes the system more scalable and resilient. If one node fails, the others keep working. In this project, ESP32 boards serve as the distributed nodes.#### NIC (Network Interface Card)
What: The hardware component that physically connects a device to a network.Why relevant: The NIC is where all packets first arri captures packets directly from here.---
18. Project De Note
This project started as a basic embedded IDS proposal for an academic course submission. After re existing tools and current trends in IoT security, it became clear that rule-based detection alone is not enough — most real-world IoT compromises invol changes that no existing signature would catch. That realization led to the addition of the beha fingerprinting layer, which is now the core differentiator of this project.
The proposal has gone through multiple re. The current README represents the second major — upgraded with beha fingerprinting, distributed ESP32 node support, and a more honest e plan compared to the original draft.
<br>
<di="right">
*Prepared by: Sagar Biswas*
*Date: 27-02-2026 (Revised: 06-03-2026)*
</div>
项目信息
开发语言:未知
Star 数:26
技术要点
该项目属于防护思路方向的开源资源,代码结构清晰,适合安全研究人员学习参考。项目围绕Behavioral Fingerprinting-Augmented Embedded IDS on Raspberry Pi 4 + ESP32. Detects zero-day attacks by learning per-device traffic profiles using Isolation Forest; no signatures needed. Features distributed MQTT nodes, real-time Flask dashboard, iptables auto-blocking, and GPIO alerts.展开,提供了可运行的实现,对理解相关安全机制、工具原理与攻防技术具有较高的研究价值。
从技术实现角度看,此类项目的核心在于对底层原理的深入理解与工程化落地。开发者在研究过程中可以结合官方文档与社区讨论,梳理项目的初始化流程、核心模块职责与数据流转,逐步掌握其中的技术细节与设计思路。
使用与学习建议
1. 下载源码压缩包,解压到本地环境。
2. 根据项目类型准备对应的运行环境与依赖。
3. 按照 README 中的步骤完成配置与部署。
4. 在隔离的测试环境中运行验证,避免影响生产系统。
免责声明
本资源来源于开源社区,仅供安全研究、技术学习与合法授权范围内的攻防演练使用,请勿用于任何非法或侵害他人权益的用途。使用本项目产生的一切后果由使用者自行承担。